Michael McFadyen's Scuba Diving - Kiyosumi Maru
 |
The Kiyosumi Maru in Limon Bay, Cristobol,
Panama Canal Zone, on 17 July 1937 |
On 30 May 1933 the keel of a new vessel was laid down at Kawasaki's dockyard at the Kawasaki Dockyard at Kobe. The vessel was the Kiyosumi Maru. She was launched on 30 June 1934 and completed on 5 October 1934. The new ship was 137 metres long and 18.6 metres wide and displaced 6,983 tons. She was powered by a seven cylinder 8,375hp Mitsubishi-Sulzar diesel engine and was capable of 18.73 knots.
The name of the ship is often given as Kiyozumi Maru, Keyusumi Maru or Keyosumi Maru (this is perhaps the most correct English spelling, but I will stick to the most commonly used spelling of Kiyosumi Maru). Note that the spelling in Lloyds Register is Kiyosumi Maru.
The Kiyosumi Maru was a fairly modern design for her days. Although primarily a freighter, she also carried up to 12 passengers and the smoking saloon was said to be designed in Jacobean style. She was owned by Kodusai Kisen K.K of Tokyo.
From 30 October 1934 till 30 October 1941 the Kiyosumi Maru was chartered by the Nippon Yusen K. K. Line. She was placed on the cargo-passenger run between Kobe and New York for the seven years. Ports of call included Singapore, Manila, Penang, Los Angeles, Panama Canal, New York, Baltimore, New Orleans, Galveston, Yokohama and Moji.
The ship was officially taken over by the Japanese Navy on 1 November 1941, over four weeks before Pearl Harbour, and converted to an armed auxiliary cruiser with eight guns, anti-aircraft guns and two torpedo launchers. It is thought that she may have been converted as early as August 1941. On 5 September 1941 Rear Admiral-Retired Okamura Masao (38) was posted as the Commanding Officer. Okamura simultaneously assumes joint command of Aikoku Maru.
On 7 November 1941 the Kiyosumi Maru was assigned directly to the Combined Fleet in Rear Admiral Takeda Moriji's (38th) 24th Squadron (Raider) with Aikoku Maru and Hokoku Maru. On 1 December 1941 she was commissioned in the Imperial Japanese Navy at the Kure Naval District. The same day she arrived at Osaka. Conversion to an 8,613-ton armed merchant cruiser begins. During this work, eight 150-mm (5.9-inch) single mount guns, two 13.5-mm machine guns, two 533-mm (21-inch) torpedo tubes were fitted. She also was converted to carry one Type 94 Kawanishi E7K2 "Alf" reconnaissance floatplane. A new, but unknown, Captain is the Commanding Officer.
On 18 December 1941 the conversion is completed. The next day she departed Osaka and on 21 December 1941 she arrived at Kure. It is unclear what she did for the next month. On 21 January 1942 she departed Kure and arrived at Shimoda. She left Shimoda later in the month and on 4 February 1942 arrived at Kure. Two days later she departed Kure for an unknown location.
On 19 March 1942 she arrived back at Kure. On 29 March 1942 the 24th Squadron is disbanded and on 10 April 1942 she is assigned to the Southwestern Area Fleet.
On 26 April 1942 the Kiyosumi Maru departed Kure and arrived back four days later. On 2 May 1942 she departed again and arrived back three days later on 5 May 1942. So far, she has not done much more than internal Japanese work.
On 9 May 1942 at the Kure Naval Arsenal she started loading heavy equipment and the Kure No. 5 Special Naval Landing Force for transport. On 15 May 1942 she departed Kure for Guam with transports Brazil Maru and Kinryu Maru. On 18 May 1942 she arrived at Guam and departed the same day for Saipan, arriving there on 20 May 1942.
On 28 May 1942 the Kiyosumi Maru was part of Operation "MI" - The Battle of Midway. She was in Vice Admiral Kondo Nobutake's Midway Invasion Force Transport Group with oiler Akebono Maru, transports Zenyo Maru, Toa Maru No. 2, Argentina Maru, Brazil Maru, Azuma Maru , Keiyo Maru, Goshu Maru, Kano Maru, Hokuriku Maru, Kirishima Maru and Nankai Maru. Also along for the battle were Rear Admiral Fujita Ruitaro's IJNS Chitose and Kamikawa Maru. The transports carried an airfield construction unit, Lieutenant Colonel Ikki Kiyonao's Imperial Japanese Army detachment and two battalions of Special Naval Landing Forces.
Rear Admiral (later Vice Admiral) Tanaka Raizo's DesRon 2's light cruiser IJNS Jintsu and DesDiv 15's IJNS Kuroshio and IJNS Oyashio, DesDiv 16's IJNS Amatsukaze, IJNS Hatsukaze, IJNS Tokitsukaze and IJNS Yukikaze and DesDiv 18's IJNS Kagero provide the escort with destroyer-transports IJNS Shiranuhi, IJNS Kasumi and IJNS Arare.
On 3 June 1942 the convoy was bombed by nine Boeing B-17 "Flying Fortresses". Later, the convoy was also attacked by three torpedo-carrying Consolidated PBY "Catalina" amphibious patrol planes. The tanker Akebono Maru is hit in the bow and the Kiyosumi Maru is strafed. At 2.55 am on 5 June 1942, the Combined Fleet's Commander-in-Chief Admiral Yamamoto Isoroku, aboard his flagship IJNS Yamato, ordered Operation MI cancelled.
On 13 or 16 June 1942 the Transport Group arrived at Guam and disembarked Lt Col Ikki's detachment. They departed the same day. On 2 July 1942 they arrived at Kure.
On 10 July 1942 Captain-Retired Kurosaki Rinzo (37) assumed command. On 14 July 1942 the Eighth Fleet (Outer South Seas Force) is organised under Vice Admiral Mikawa Gunichi. They departed Kure for Singapore escorted by destroyer IJNS Uranami. On 17 July 1942 they arrived at Takao, Formosa (now Taiwan). The next day they departed and on 23 July 1942 they arrived at Singapore. The Kiyosumi Maru departed Singapore that day for Penang, Malaya.
On 7 August 1942 the US forces invade Guadalcanal, British Solomons (now Solomon Islands). Marines land on Florida, Tulagi, Gavutu, Tanambogo and Guadalcanal opening the campaign to retake the islands. On 20 August 1942 the Kiyosumi Maru is assigned to transport elements of Lieutenant General Sano Tadayoshi's 38th Infantry "Hiroshima" Division to Rabaul for the reinforcement of Guadalcanal.
On 13 September 1942 the Kiyosumi Maru repairs are started at Singapore. It is not clear what these repairs may be, but they must be relatively minor as they are completed by 17 September 1942. After this she departed Singapore for western Sumatra. here she loaded elements of the IJA's 38th Infantry Division for duty in the Solomons. On 24 September, 1942 she departed Begawan for Rabaul carrying elements of the IJA's 38th and 230th Infantry Divisions. She arrived in Rabaul on 6 October 1942. Here she loaded an infantry battalion for transport to Wewak, New Guinea.
It is presumed that for the next two months she served in the New Guinea/Solomons area.
On 2 December 1942 the Kiyosumi Maru departed Singapore for Rabaul. On
13 December 1942 a new, but unknown, Captain assumes command. It could have been Captain Hara as he left as skipper in April 1943 and there is no mention of him becoming Captain. Captain Kurosaki is reassigned to the Yokosuka Naval District, then as Commanding Officer of Akagi Maru on which he was killed in action on 2 March 1944. On 16 December 1942 she departed Rabaul on a troop transport run to Wewak escorted by the destroyers IJNS Yugumo, IJNS Kazagumo, IJNS Makigumo and IJNS Akizuki. They arrived at Wewak on 18 December 1942 and after disembarking the troops, she departed. On 21 December 1942 she returned to Rabaul and on 29 December 1942 she arrives back at Kure.
On 3 January 1943 the Kiyosumi Maru departed Kure and arrived on
5 January 1943 at Yokosuka. She departed on 10 January 1943 and on 17 January 1943 arrived at Sasebo. On 23 January 1943 she became part of Operation "C-3" (HINOE-GO-3) - The Reinforcement of New Guinea. That day she arrived at Tsingtao, China. On 29 January 1943 she departed carrying soldiers of the IJA's 20th Infantry Division and general cargo. She arrived in Palau on 5 February 1943 and departed two days later with Aikoku Maru as the second element of HINOE-GO-3.
On 19 February 1943 Kiyosumi Maru departed Palau again after embarking additional soldiers and general cargo (this may be the same action as above). On 19 February 1943 when off Palau, USS Runner skippered by Lieutenant Commander Frank Fenno attempted to intercept the second group of C-3 but was bombed by an E13A1 "Jake" of the 902nd NAG based at Palau. The Jake drops a single 250-kg bomb that destroys Runner's periscopes and sound gear and forces Fenno to return to Pearl Harbor.
On 23 February 1943 the Kiyosumi Maru arrived at Wewak where she unloaded her cargo. On 26 February 1943 she arrived at Palau and on 4 March 1943 at Takao, Formosa. On 10 March 1943 she departed Takao.
On 12 April 1943 an unknown Captain assumes command of the Kiyosumi Maru. Captain Hara is reassigned to the Kure Naval District and later as the Commanding Officer of Kamikawa Maru on which he is killed in action on 29 May 1943. On 14 April 1943 she arrived at Kobe (no idea where she had been for the past four weeks). On 20 April 1943 she departed Kobe.
Her location for the next three weeks are unknown and on 13 May 1943 she arrived at Kure. On 24 May 1943 she departed and the next day arrived at Sasebo. It appears she may have then done another voyage to Wewak, New Guinea, transporting a troop unit.
On 24 June 1943 the Kiyosumi Maru arrived back at Kure. On 30 June 1943 she departed Kure in fleet convoy G with Kagu Maru and oiler Kenyo Maru escorted by kaibokan (escort) IJNS Etorofu. She arrived at Sasebo the same day. On 2 July 1943 she departed Sasebo in fleet convoy G.
On 10 July 1943 they arrived at Singapore. Three days later they departed for Nancowry and Car Nicobar Islands (this is in the north-east Indian Ocean between the Bay of Bengal and the Andaman Sea) carrying troops and supplies.
On 2 August 1943 she arrived at Takao, Formosa, presumably after completing the above task. On 7 August 1943 she departed again with troops and supplies for Rabaul.
On 18 August 1943 Captain-Retired Maki Kikuta (34) assumes command of the Kiyosumi Maru (notice how many skippers the ship has had in the less than two years since the war started - this appears to be common to all Japanese ships).
On 14 September 1943 she arrived at Kure. It is not clear what she has been doing for the past month or so. On 17 September 1943 she departed but is back again two days later.
On 1 October 1943 Captain Maki is designated the Supervisor of Modifications. The Kiyosumi Maru is demilitarised. Her 140-mm (5.5-inch) guns are removed and she is rerated as a transport in the Kure Naval District.
Later in October 1943 the Kiyosumi Maru departed Kure for Truk. On 1 November 1943 she departed Truk for Rabaul carrying 1,342 reinforcement troops in convoy "Tei No. 4" with light cruisers IJNS Isuzu and IJNS Naka. On 3 November 1943 when 60 miles north of Kavieng, New Ireland, New Guinea, the convoy is attacked by 13th Air Force B-24 "Liberator" bombers. The light cruiser IJNS Naka suffered a near-miss and the Kiyosumi Maru is damaged. IJNS Isuzu towed her to Kavieng.
On 4 November 1943 the destroyer IJNS Minazuki departs Kavieng to assist Kiyosumi Maru. Minazuki removes 267 troops from the transport and takes them to Rabaul. On 25 December 1943 the Kiyosumi Maru is still in
Kavieng. Aircraft from Rear Admiral Frederick C. Sherman's TG 50.2's USS Bunker Hill (CV-17) and USS Monterey (CVL-26) attack and sink the transport Tenryu Maru (this is diveable in 16 to 22 metres but when I went to Kavieng in 2008 no mention was made of being able to dive the wreck) and damage the Kiyosumi Maru and minesweepers W-21 and W-22.
On 30 December 1943 the Kiyosumi left Rabaul bound for Truk (Chuuk) Lagoon together with DD Yukaze and Minesweeper No 22. On 31 December 1943 she was spotted by Lieutenant Commander Cryrus C. Cole in the submarine USS Balao (SS-285) near the Bismark Archipelago, 400 kilometres north of the Admiralty Islands. The Balao followed and at 2345 hours on 1 January 1944 it fired a salvo of six torpedoes. Three hit home but although the Kiyosumi Maru did not sink, she was disabled and the forward hold flooded.
One report says the cruiser IJNS Oyodo towed her into Truk but in reality IJNS Naka arrived from Truk the same day and took her in tow. The next day the destroyer IJNS Tanikaze departed Truk to assist Naka tow the Kiyosumi Maru to Truk. The light cruiser IJNS Oyodo and destroyer IJNS Akizuki also arrive and provide escort. On 4 January 1944 IJNS Oyodo and IJNS Akizuki returned to Truk. On 8 January 1944 the Kiyosumi Maru arrived at Truk under tow. Repairs to Kiyosumi Maru are started.
On 17 February 1944 Kiyosumi Maru was in the Repair Anchorage off
Fefan Island, Truk. The Kiyosumi Maru was attacked at 0900 on 17 February 1944 by Douglas SBD 5 Dauntless dive bombers from USS Yorktown and suffered a direct hit in hold two and again at 1330 by Dauntless's from USS Enterprise on both sides of the bridge. It is reported that 43 people were killed and 9 seriously injured. As a result of the torpedo damage and the bomb hits, the Kiyosumi Maru sank shortly after.
Captain Maki was killed in action. He was promoted to Rear Admiral posthumously. On 31 March 1944 the Kiyosumi Maru was removed from the Navy List.
A GPS Reading of N7° 22' 25.7" E151° 50' 37.2" using WGS84 as the datum will put you on the bridge.
Today the Kiyosumi Maru sits on her port side at a maximum depth of 31 metres with the starboard hull at 12 metres. The ship has six holds, three in front of the bridge and three behind.
 |  |
One of the few remaining lanterns
in the forecastle of the Kiyosumi Maru | The torpedo/bomb hole in Hold Two of the Kiyosumi Maru |
As indicated earlier, the ship originally had eight guns but these are not now on the ship, being removed in October 1943 when the ship was demilitarised. However, the gun platforms remain. There is one on the bow and stern, and pairs adjacent to holds one, two and five.
A normal dive starts at the bridge and heads across the hull towards the bow. After about 30 metres you will come to the bomb hole that caused the ship to sink. You can easily enter this and go into hold two. For now, head out of the hold and come back on the return trip.
From hold two, head to the bow. Of course the gun is missing but the platform is there. Under this is the forecastle. In the forecastle there is a hidden and hard to find feature that is quite amazing. There is a door on the starboard side and this goes in about five metres. There is another door above you and if you rise up through this and look back towards the rear of the ship, you will see where there used to be a whole wall of lanterns, all perfectly intact and sitting on their sides on the storage shelves.
 | 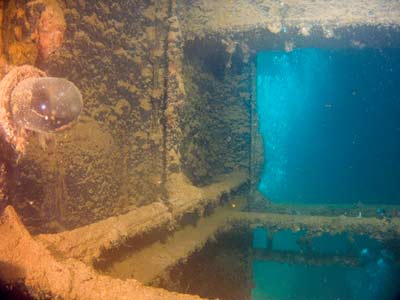 |
| Some bricks at the entrance to one of the forward holds | A light bulb and cover in a hold |
In 1997 there were 10 to 12 of the lanterns in this little hidey hole but in September 2004 only a couple remain. All the rest appear to have been stolen, presumably by locals as there is no way a diver using one of the charter boats could get the lantern back on the boat, let alone out of the country. I forgot to look here in 2011 to see if they were still there.
The front hold (one) is plated over on the 'tween decks and access is via manholes (try the bottom right one) or from hold two (see later). The beams from the top level are scattered over the side of the hold, deck and sand. There are two large containers (water or ???) inside the hold, towards the bow and high in the hold.
You can enter hold two from hold one via some doors in the 'tween deck. You can also enter via the hold or the bomb hole. This is a large hole on the upper side of hold two, that is the side of the hull along the waterline. This was presumably from the first attack of the morning. The hold has some more large containers on the bottom towards the bow but is otherwise empty.
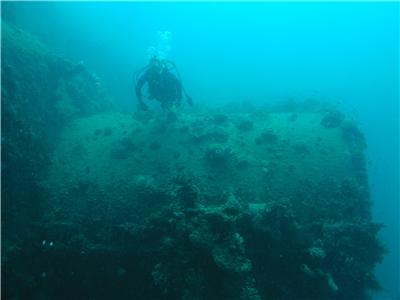 | 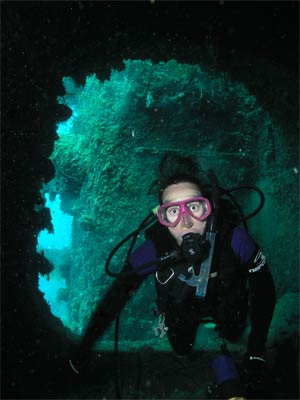 | |
| Kelly McFadyen swims over the funnel of the Kiyosumi Maru | Kelly McFadyen enters one of the hatchways
under the remains of the Bridge |
Hold three also has damage, this time under the keel. This appears to have been a refrigerated hold. There are some spare parts in here, including a drive shaft for a ship.
The bridge is damaged badly from the two bombs but still is very interesting for exploration. You can swim through the lower levels and exit behind the superstructure over hold four. The engine room is very large and can be entered through one skylight, the damaged area or a couple of doors inside. Behind the engine room is the funnel.
I cannot remember what was in hold four but the fifth hold has some has one black container and some bicycles in the 'tween decks. These are at the back right. The lower hold is covered by plating.
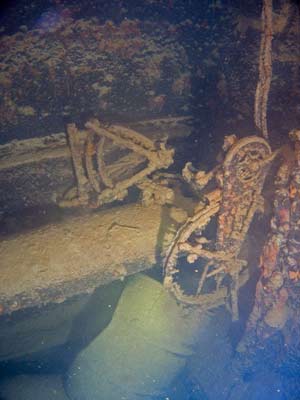 | 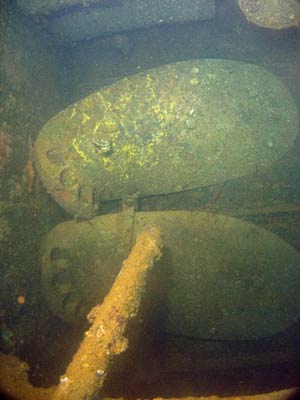 | |
| The two bikes in hold five | Two of the spare propeller blades in hold six |
The torpedo launchers can be seen on the rear hold. Under this platform there are lots of pipes. Inside hold six there are more containers and on the 'tween decks, back wall, there are four blades for a ship (but not the Kiyosumi Maru. At the stern the prop and rudder are still in place. There are other bits and pieces to be seen in the holds and in the under bridge area.
All in all, this is an excellent wreck (like all those in Chuuk) and is usually dived as a second dive.
Dives:
17 February 1994
9 November 1997
18 November 1997
5 September 2004
28 October 2011
Additional Photos
Photos by Shaun Reynolds taken March 2013.
 |
| Another shot of the spare blades in Hold 6 of the Kiyosumi Maru |
References:
Hailstorm over Truk Lagoon by Klaus Lindemann
Wrecks of the Kwajalein and Truk Lagoons by Dan E. Bailey
Personal conversation with researcher Peter Cundall, 22 September 1997
26 Principal Shipwrecks of Truk Lagoon by Capt. Lance Higgs
Warships of the Imperial Japanese Navy, 1869 - 1945 by Hansgeorg Jentschura et al
Lloyds Register 1938-39, 1945-46
IJN KIYOSUMI MARU: Tabular Record of Movement
| 
 v6.00.307 © 2003-2005