 |
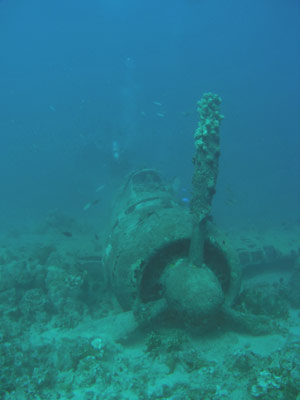
| The Kate from the front |
In 1935 the Japanese Government put out a specification request for a new aircraft. This was to be a three seat carrier based bomber or torpedo bomber with the then advanced features like variable-pitched propeller, hydraulically operated landing gear, Fowler flaps, integral wing tanks and more. A speed of 330 km/h was demanded.
Nakajima Hiroki KK submitted the winning design of the Nakajima B5N1. The Japanese Navy designation was Type 97 Carrier-borne Attack Plane, Model 12.
This was a aluminium skinned aircraft, 10.3 metres long and with a wingspan of 15.52 metres. The Model 11 weighed 2,107 kg empty and had a normal loaded weight of 3,650 kg. The new plane was powered by a single 770 hp Nakajima Hiraki 3 nine-cylinder radial engine driving a three bladed variable pitch propeller. This gave it a maximum speed of 350 km/h and a range of 1,100 kilometres. An updated Model 12 had either a 970 hp or 985 hp Nakajima Sakae 11 14-cylinder radial engine.
It was armed with one 7.7 mm machine gun manually operated from the rear cockpit. It could carry two 250 kg or six 60 kg bombs under the wing. Like all Japanese war time aircraft, it was given a nickname by the Allies to help with communicating information about the various aircraft. These names were all male and female Christian names (the Zero was actually called the Zeke by the Allies). The Nakajima B5N1 was called "Kate".
The prototype flew in January 1937 and it went into production later in 1937. The planes fought in the war against China which started in 1937 and continued until Japan attacked the USA at Pearl Harbor. As a result of its use in wartime against China, some apparent weaknesses were uncrovered. These included the lack of protection for crew and fuel. It was decided that it would not be possible to add armor due to weight considerations, so it was decided to change the engine in an attempt to give more power and thus speed to outrun the enemy.
In 1939 a revised model, the B5N2, went into production. This was a few inches shorter, had a 1,150 hp Nakajima Sakae 21 14-cylinder radial engine that gave a maximum speed of 378 km/h and an increased range of 1,990 kilometres when overloaded to 4,100 kg. This version also had two 7.7 mm machine guns mounted on the engine and firing through the propeller as well as either one or two manually operated 7.7 mm machine guns in the rear cockpit. A major change was that the B5N2 was able to carrier one 800 kg Type 91 torpedo or three 250 kg bombs or six 60 kg bombs.
During the attack on Pearl Harbor, quite a few of the Kates took part. There were 103 of the B5N1 bombers and 40 of the newer B5N2 torpedo bombers. Later in the war, the B5N2 torpedo bombers were the mainstay of the attacking aircraft that sank the American aircraft carriers, USS Yorktown, USS Lexington, USS Wasp and USS Hornet.
A total of about 1,150 (or 1,149) were produced, 670 by Nakajima, as well as 200 by Aichi Tokei Denki and 280 by Dai-Juichi Kaigun Kokusho.
In the Papua New Guinea, there is at least one fully intact Kate that can be dived. This is located to the west of Kavieng, the main town and capital of New Ireland Province. The aircraft is located 32.9 kilometres west of Nusa Resort (which is just off Kavieng township). It is a 55 minute run from Nusa on Scuba Ventures boat, although it is normally done as a third dive of the day using left over air from one of the earlier dives. Note that one of the dive shops in Kavieng claims that the plane at this location is a Jake (a seaplane), but it is not a seaplane as you can see the tailwheel (see photos).
The plane is located just off the western side of the southern end of Anelaua Island at GPS S2° 35' 13.8" E150° 29' 6.7" using WGS84 as a datum. The plane is located in about 12 metres of water and faces south-west. It is normally visible from the surface. It was discovered in the 1960s and was dived by Rod Pearce, owner of MV Barbarian in about 1984.
 |  |
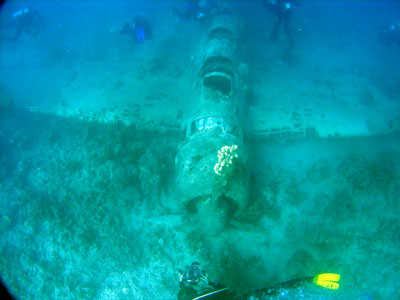
| A photo of the Kate as you approach it | The starboard flaps are down |
It appears to me that the plane has come in over the island without engine power (as I will explain later) and made a controlled crash landing on the water. The plane has landed without major damage and then, once it has sunk, ploughed into the bottom with some force. It would appear that the crew escaped as the three hatches are open.
Once you descend you will see that the three bladed prop sits with one blade vertical and the other two buried. As the visible prop has no damage, it can be taken that it was not turning when the plane hit the water as the force of the water on the rotating prop causes the tips to bend back towards the rear of the place. Therefore, the plane was either out of fuel or had other fatal engine problems.
 |  |
| Another shot of the Kate from above front | The tail wheel |
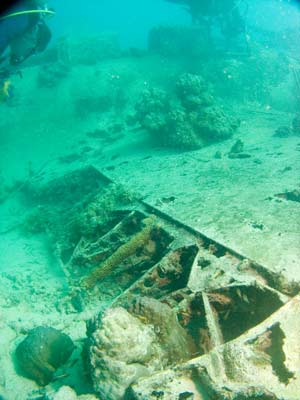
If you look at the port wing you will see that the flap is damaged. This has happened when the wing struck the coral on the bottom as the plane sank. Swim over the fuselage and look at the starboard wing. The flap is fully extended (see the photograph), confirming that the pilot was attempting a controlled crash landing. As the B5N2 had a stalling speed of only 50 mph (80 km/h), it could easily crash land on the water without causing major damage.
Head to the rear of the plane. The starboard tail wing is badly damaged from where it hit the reef. The tail itself has collapsed over to the port side, causing a sort of inverted U. Under the tail, the rear wheel can clearly be seen (see the photograph).
 |  |
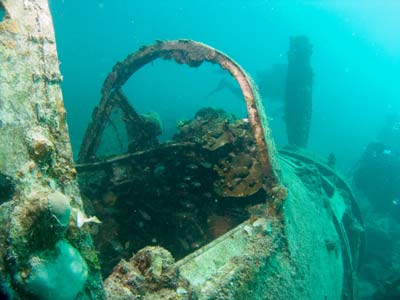
| The view from in front of the prop | A shot from the starboard side showing pilot's cockpit and prop |
The fuselage is intact, and you can look in each of the three cockpits. From memory, neither the rear or engine mounted guns are present, presumably salvaged by the Japanese or perhaps the first to dive the wreck. In front of the rear gunners cockpit and behind the observer's cockpit (the middle one), there are three small oxygen cylinders on the port side. The main cockpit still has the joystick and other controls.
This is a great dive to use up your remaining air. Visibility is normally never great, we had about 12 to 15 metres. A unique dive!
References:
| 
 v6.00.307 © 2003-2005