|
Michael McFadyen's Scuba Diving - Fumitsuki
The Imperial Japanese Navy ship Fumitsuki, a Mutsuki class destroyer, was planned in 1923 and built during 1925. She was launched on 16 February 1926 from the Fujinagata Zosen shipyard at Osaka, although then she was simply known as "No 29". She was completed on 3 July 1926. The name Fumitsuki did not come until 1928 (alternative spellings are Fumizuki and Humiduki). The new ship originally displaced 1,772 tons and was 103.3 metres (338.7 feet) long and 9.2 metres (30 feet) wide. She was powered by four oil fuelled Kampon boilers which supplied steam to two Parsons geared turbines. The resulting 38,500 shaft horsepower propelled the ship at 33.5 knots fully loaded and 37.5 knots when lightened considerably. The two props are three bladed and high pitched.
The new ship was quite well armed, with four 45 calibre guns, two 7.7mm guns, two by three torpedo launchers, 16 mines and 18 depth chargers. However, in 1941-42 the Fumitsuki was refitted and many changes were made. The displacement was increased to 1,913 tons, the aft torpedo launchers removed, mines removed, all guns removed and in place two 50 calibre guns and ten 25mm anti-aircraft guns installed. An additional 18 depth charges were carried and four throwers installed. As would be expected, maximum speed dropped to 34 knots.
As part of the 5th Destroyer Flotilla, the Fumitsuki saw service in the Solomon Islands in 1942-43, mostly around Guadalcanal. Many of her sisterships were also involved in this action and many lost. In fact, none of the 12 Mutsuki class destroyers lasted to the end of the War. After Guadalcanal, the ship was stationed in Rabaul, Papua New Guinea. In March 1943 the Fumitsuki was attacked and damaged by American planes while travelling from Finschhafen to Kavieng (New Ireland) and on 3 April 1943 was again attacked and damaged, again while on her way to Kavieng. One of the boilers was flooded after a near miss opened up the hull.
On 4 May 1943 the Fumitsuki arrived at Yokosuka escorting the destroyer Fujikawa Maru.
On 5 and 6 October 1943, the Fumitsuki was involved in the evacuation of Guadalcanal and got caught in a fight with US destroyers. Her group withdrew but the other ships in the Japanese fleet remained and lost. On 9 October 1943 while on her way to Rabaul and Kavieng (surely a hex destination for the Fumitsuki), she was damaged again by US planes. On 4 January 1944 the Fumitsuki was attacked by planes from the USS Bunker Hill and USS Monterey.
The Fumitsuki was definitely destined for disaster as on 31 January 1944 she was again attacked and damaged (at least the fourth time in 10 months) by Consolidated Vultee B-24 Liberator bombers while moored in Rabaul. This damage was severe but she was still able to proceed under her own power, as escort for a convoy, to Chuuk for repairs. The convoy arrived in Chuuk on 6 February 1944. Repairs apparently began almost immediately, with boilers, machinery and other items disassembled. Most ammunition was also removed. The Fumitsuki was anchored about half way between the northern points of Dublon and Fefan Islands, near the Kiyozumi Maru and Kansho Maru.
On the morning of 17 February 1944, the first photos taken during Operation Hailstone show the Fumitsuki lying as described in the preceding paragraph. After the first wave of American aircraft pummelled the Chuuk fleet, the Fumitsuki made urgent repairs to the one boiler and turbine available and made off to the north-west using one prop. At about 1030 hours she was attacked by planes and a near-miss fell adjacent to the port of the aft engine room. This apparently had a delay fuse and it exploded under the ship causing a deal of damage to the hull. The only fully assembled engine was now out of service.
The captain dropped anchor and the crew attempted to make urgent repairs to the leaking hull. A tug (or perhaps the destroyer IJN Matsukaze) came to try to move the Fumitsuki to Dublon but the ship was low in the water, her anchor still out (there was no power to pull it in) and the wind was against her. This was futile and the crew abandoned ship some time after midnight. At about 0530 hours on 18 February 1944, the Fumitsuki sank stern first. She was located to the north-west of Fefan Island and west of the southern end of Moen Island.
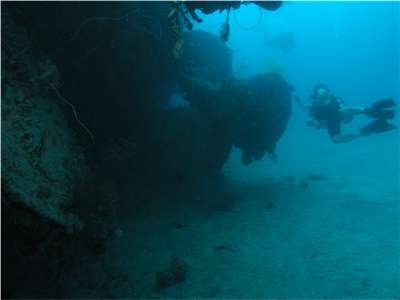 |  |
Bruce Graham and the Fumitsuki starboard prop
Photo by Kelly McFadyen | The torpedo launcher of the Fumitsuki
Photo by Kelly McFadyen |
The wreck of the Fumitsuki was found in April 1987 by Tomoyuki Yoshimura and Blue Lagoon Dive Shop using Mr Yoshimura's research (war reports and talking to survivors, including the captain).
Today the wreck of the Fumitsuki lies on a sandy bottom at a maximum depth of 36 metres. The wreck is intact but is not really very large. As such, it does not sit high above the bottom. The wreck has a list of 15° or so to port. The superstructure is about 30 metres, the starboard side about 31 metres and the port side a bit deeper at 33 metres. Therefore, this wreck must be done as a first dive as there are no shallow bits.
The first thing you notice as you descend to the wreck is the compact size of the ship. It is narrow, very narrow (less than 10 metres). Starting at the stern, a description of the wreck is as follows. Of the two props, the starboard shows parts of all three blades and the port one only has one blade showing, the rest is buried in the sand. There is very obvious damage to the starboard side of the stern as well as the port side, although the reports state that the bomb near-miss was on the port side. Perhaps this damage is from the stern hitting the bottom when she sank. There is also a hole on the port side from the bomb explosion and damage across the deck. There are depth charges and launchers just back a bit from the stern.
In front of here there are two guns platforms. They originally were both mounted by guns but the rear-most one was removed, presumably in the refit. The remaining gun appears to be identical to the bow gun. In front of the platforms is where the second set of torpedo launchers was mounted. These were removed in the refit but you can see where they were located as the railway tracks used to move the torpedoes across the deck remain visible. All that remains in this spot, apart from the tracks, is empty deck space.
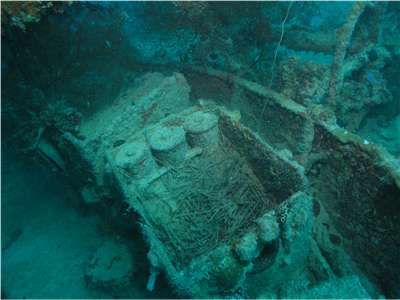 |
Two of the shell boxes on the forward gun,
including an open box showing shells
Photo by Kelly McFadyen |
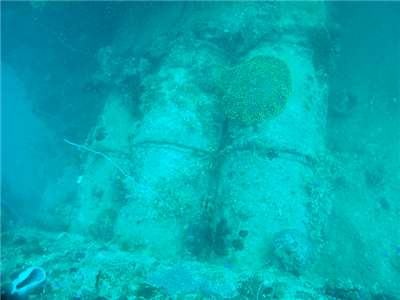
The rear funnel is forward of here and the first section of superstructure. Behind the funnel is a search light platform and in between the funnels there are two machine guns (originally a heavy gun). The forward funnel has fallen over and you can look into the engine room and see two of the four boilers. Alongside the funnel area you can see the apparatus that housed the torpedoes for the forward torpedo launcher (more about this later). The entire bridge area is destroyed, not as one would imagine from a bomb, but just through erosion over the years. This happened in 1988. There is some china in this area as well as some gas masks.
In front of the bridge is the only remaining torpedo launcher. It looks like three huge pipes with a steel wall at one end. The pipes held the torpedoes and the "wall" was a shield for the operators. The launcher could hold three torpedoes, presumably they all had to be loaded facing the shield but this may not have been the case. The launcher was pivoted in the middle and it rotated to port or starboard so that it could fire. The torpedoes were loaded from the rear of the ship.
On the same level as the torpedo launcher is the forecastle. This can be accessed via either of two doors located on each side of the ship. The room is quite open and has a wheel apparatus on the starboard side near the door. There are some hatchways leading to the lower level of the forecastle. You can drop down there but it is very cramped.
Above and in front of the torpedo launcher is the bow. You can see the front gun platform here as well as the main gun. There are some (four I think) shell boxes here as well as some loose shells and free cordite.
The bow is quite interesting. As well as seeing the anchor chain from the starboard side streaming out from the wreck, the shape of the bow, a large winch, the deck in the bow area and the hull for the first 10 or 15 metres is quite different from most other wrecks you will ever see, especially in Chuuk.
This is also an excellent wreck, a good introductory first dive of the day. Visibility is not as good as some other wrecks but at 15 to 20 metres, very good for what most divers are used to back home. I spent about 28 minutes on the wreck and had to do seven minutes decompression at three metres.
Dives:
6 November 1997
Additional Photos
Photos by Shaun Reynolds taken March 2013.
 |
| The starboard prop of the IJN Fumitzuki |
References:
Hailstorm over Truk Lagoon by Klaus Lindemann
WII Wrecks of the Kwajalein and Truk Lagoon by Dan E. Bailey
IJN Submarine Tender HEIAN MARU: Tabular Record of Movement
|  v6.00.307 © 2003-2005

