|
Michael McFadyen's Scuba Diving - HMAS Swan
Australia's newest (when I wrote this in 1998) and one of its largest wreck dives is the wreck of the former HMAS Swan. For more information on the ship and its heritage, see my article on HMAS Swan.
 |  |
| HMAS Swan nearing Garden Island in Sydney Harbour |
The access holes cut in the starboard side of the hull
are very evident in this photo |
In June 1998 I travelled to Western Australia specifically to dive the wreck of the Swan. For information on how to get to the the wreck location (especially for easterners), see my article entitled Dunsborough - Home of HMAS Swan.
There are (were?) two dive operators at Dunsborough and I chose Cape Dive and Tackle. Unfortunately on the first day of diving the weather conditions were abysmal. The winds from the south were gale force and it was pouring rain. I was not very optimistic about my chances but on arriving at the shop, Shelly, owner of the operation, declared that if we were prepared to go, the skipper was willing to take my buddy and I out to the wreck. We decided that we would give it a go, especially as we had travelled more than 3,600 kilometres from Sydney for this chance.
We loaded all our gear onto Cape Dive's small aluminium "rubber" duck (they apparently have a much larger vessel that they use during peak season) and together with Jason, the boat skipper, we drove the short distance to the boat ramp. Once launched, we headed to the west parallel to the coastline and in the protection of the hills to the south. After a couple of kilometres we headed out to sea. The protection offered by the land soon disappeared and we were in very choppy seas. The little vessel handled it well but this was not a trip for those prone to seasickness. A few minutes later we arrived at the wreck, clearly marked by a series of moorings and a marker buoy (total travel time less than 10 minutes I guess).
We geared up quickly and entered the water. We had already been briefed back at the shop and Jason gave us a quick on-site briefing so we could get our bearings. The water was not too bad visibility-wise, especially considering the seas. We dropped down the mooring line and were soon at the very bow of the ship. Wow!! This looks majestic, a sharp, pointy bit that shows that this vessel was built for speed. We went straight to the sand (31 metres) and then returned to the foredeck. In front of the anchor chain winches there is a hole and we entered the hull here.
The bow area has many compartments, some small, some larger. These were naval stores, the ship's administration offices, canteen, paint shop, stores and some heads (toilets) and showers. There are toilets and showers on different levels. The depth is 25 metres.
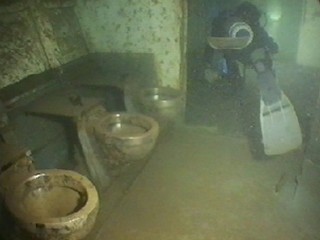 |  |
| Toilets in the bow | The main armory of the ship |
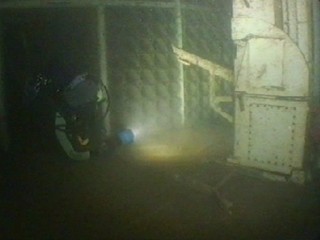
A main access way runs most of the length of the ship along the centre. This passageway, called the Broadway (Lieutenant Commander Mark Taylor who served on the Swan in 1991-3 told me in March 2002 that it was called simply the main passageway during his time on the ship but others have told me this is what they called it), is encountered time and time again during dives. After a few minutes you can drop to the lower level at 30 metres. Soon you enter the main armory of the ship. This is immediately below the 4.5 inch gun turret. This large compartment extends the whole width of the ship and has front and back bulkheads almost totally occupied by "racks" for holding shells. There are also some other racks on false walls in this compartment. There is also a "lift" contraption that was used to move shells to the turret. There are a number of ways out of the armory. You can exit through a hatch to starboard (this is the third hole from the right on the lowest level in the photo above) or holes cut in the front and rear bulkheads.
We exited the hull here and re-entered a level up (25 metres) and a bit further astern (the top hole immediately below the bridge in the photo). This goes into a compartment with lino on the floor and leads to the Wardroom Galley. I have been told that this compartment was the "CommCen" or communications centre or "transistor" room. The Main Galley is a bit further back, both are on the starboard side. The Main Galley has ovens, stoves, sinks and benches (all stainless steel), all intact.
A bit further back you come into a small alcove. This is open above and has a great deal of twisted metal lying around, especially on the port side. This was originally the location of the Limbo anti-submarine mortar. However, in more recent years it was the ship's gymnasium. You can exit here to the stern along the Broadway past a number of rooms (more later on these). An alternative is to go through a room on the starboard side and out the back through a set of double doors onto the Ikara well (anti-submarine weapon). There are a number of benches here. I have been told that they served no other purpose than for the sailors to sit on during the day! You can go up to the main deck or re-enter the hull yet again through a door on the aft port corner of the landing.
 |  |
| A clothes dryer or washer in the laundry | Inside the bridge of the Swan |
Back on Broadway, you head to the stern past more toilets (stainless steel of course). Just before the hole cut in the stern at the end of the Broadway there is a door to starboard that leads into the Laundry (26-27 metres). Inside this large compartment there is a large iron-press (to your far right as you enter) and a huge dryer and washing machine in the far left corner.
The only way out is back through the door, turn left and this goes straight out the hull. By this time you would have spent about 22 minutes underwater so it is time to start back to the bow. More about other areas of the stern later.
Rising up to the main deck (23 metres), you swim past some metal structures (a cage for holding depth charges?) and some winches. The outside deck continues on this level, partly covered, right through to the bow. We decided too get a bit shallower so we went up to the lower level of the superstructure (18 metres) and continued forward on the starboard side. There are two large boat davits and winches for the ship's launch.
The bridge is accessible from either side and the large bridge, bigger than the earlier River Class ships, still has the steering binnacle, the navigator's chair, the suspension of the Captain's chair and some of the remains of the electronic equipment. You can exit the other side of the bridge or through a hole cut in the roof.
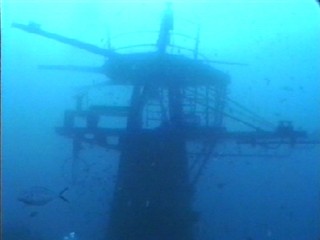
Once outside on top of the bridge (15 metres), you can see where Ikara guidance antenna radome was located (see first photograph in this article). Behind here is the main foremast which is home to an array of radio antennaes (there was originally another radar dome on top). The depth here is about 5 to 10 metres.
By this time we had been on the wreck for 32 minutes and almost out of bottom time so we returned to the bow and ascended. A great dive!!
We returned to Cape Dive's shop and in the protection of the shop, warmed ourselves with a cup of tea/coffee before getting some lunch. After a good surface interval, we returned to the wreck and again moored at the bow. This time we entered the hull behind the hole we previously used.
This is the Broadway and there are compartments to both sides. There are a number of hatches to the lower decks and we take the second, smaller one and drop two levels to a small compartment that looks like one of the crew cabins. The depth here is 29 metres and it increases to 30 metres further aft. Further back we come across a stainless steel structure that looks like a spindle or something (I am not sure what this is but my guesses of turret or sonar mount are wrong according to Lieutenant Commander Mark Taylor).
 |  |
| Machinery inside the Swan | The communications tower of the Swan |
Behind here we see a compartment that originally had engines of some sort sitting on mounts. There are some electric motors in this compartment. We again exited to starboard and re-enter a level above and find some huge exhaust fans in the centre of the ship. These look like jumbo jet engines from above. They were actually the main exhaust uptakes from the machinery spaces, turbo-driven forced draft blowers for the ship's engines. We went into the main funnel but this does not permit you to go anywhere. From here we entered the rear "false" funnel which was actually the "plenum" which used to hold the M22 Weapons radar. I was also told by Lt Commander Taylor that this was the pedestal for the LW-02 Air search radar, a large, black 6,000lb black antenna. I think that perhaps it was the M22 Weapons radar originally and changed over the years as upgrading was carried out. You can drop to the lower decks from here or exit out the rear.
My third dive here concentrated on the middle to stern section. We used a different mooring located off the port side. After reaching the ship we drop over the deck to look at the prop shafts. These can be seen as can the rudders. The props are missing, presumably salvaged by the RAN or the sinking team. We enter the hull at the stern, this time using the bottom hole. This appears to be crews' quarters and on the lowest deck you can see the prop shafts inside the hull. We rise up to the deck below the main deck and go out onto the Ikara well. We go back into ship and along the Broadway where you can see a number of round holes that provide entry to the engine room. There is also a set of stairs. These are all grated over to prevent entry.
Along from here you can enter a huge refrigerator through a hole cut in its rear wall. Exiting out the door you see another fridge and then a freezer before yet another fridge. These are all the size of a small bedroom and made of stainless steel.
Just behind the bridge is the Operations Room and we travel around the various compartments, looking at the remains of the equipment left behind. Off here is the Sonar Room.
We finish the dive on the main deck and the upper deck areas.
Our final dive on the ship is again the middle section. We see some of the previous sections of the ship as well as some other bits we have not yet seen.
During our dives we have seen some very good fishlife. As well as a number of very large samson fish in the area behind the mast, we see a lot of kingfish, many bream and a lot of other species. We also have seen a couple of western blue devilfish inside the wreck. Very good attractive but not as beautiful as the eastern blue devils.
Notes from 1998:
I used and can certainly recommend the services of Cape Dive and Tackle. Price for a double dive, including tanks and weight belts was $75. Contact Shelley on 08 9756 8778, the shop is located at 222 Naturaliste Terrace, Dunsborough.
Michael McFadyen travelled to Western Australia using his own funds and dived courtesy of his own money, so he reserves the right to mention the dive operator he actually used and enjoyed. All photos taken from Hi-8 Video.
References:
|  v6.00.307 © 2003-2005

