|
Michael McFadyen's Scuba Diving - Mak Cat
LE SCAT - OUR OLD BOAT
Readers of my web site will know that Kelly and I own a boat called Le Scat that we use for diving. Well, we did till early 2016 when we purchased a newer one. Le Scat was a 1980 model Marlin Broadbill which was first purchased by our friend Les Caterson in early 1993. In about 2000 I bought a half share in the boat and in 2010 we purchased it outright. Les still dives with us most weeks, even though he is now 78 years old (mid-2016).
Anyway, Le Scat was now 36 years old and showing it. Over the past decade the hull had gradually suffered as tiny pinhole after pinhole formed in the hulls, mostly in the same couple of lines along the hulls. At first they were welded but more recently it became impossible to weld as the aluminium just blew out. We used some marine adhesive to fix the holes. This was very successful but it started to become a monthly event to repair the hulls.
 | 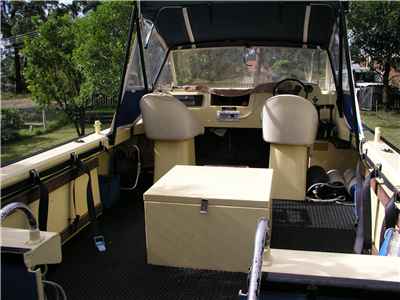 |
| Le Scat in early 2005 with new paint and engines | A photo of the deck space and transom |
SEARCHING FOR A NEW BOAT
Since we returned from our sailing trip to Northern Queensland in late October 2015, we had been looking for a replacement boat. In the first week of December 2015 I drove 2,100 kilometres (with dive buddy Greg) to Mildura in Victoria (and back) to look at a Sailfish catamaran. It was a reasonable boat, with 90 hp 2 strokes, but over priced by some $7,000 or more (since it also had some hull corrosion and trailer was not the best). I am glad I went to look, even though it cost us $500 or so, but if I did not, I would have kicked myself.
The problem is that there are only two makes of boat I was interested in, Marlin Broadbill and Sailfish. Sailfish was started in 1993 by a bloke who worked at the Marlin Broadbill factory and who set up a new business employing some of the Marlin staff. The first ones were virtually copies of the Broadbills. Both these boats are so well liked, that few ever come on the market, especially of the size we wanted (5.5 to 6.5 metres).
In early February I spotted a Marlin Broadbill 6600 called Ezy-Az for sale in north-western Sydney. The next day Kelly and I went and looked at it. It was a bit bigger than Le Scat (the model number is no indication of the "real" size of the boat - in this case it was not 6.6 metres as you would expect). It was in excellent condition, with 90hp Mercury Optimax outboards. It was also well fitted out with sounder, radios etc. The asking price was $40,000. As we needed to make sure the trailer would fit in our side yard, we did not make an offer straight away as no-one else had at that time looked at the boat. We also would have had to purchase a new 4WD to tow the boat as it would have been too large for our Prado (in my view).
Once we were home, I contacted the seller to check one measurement to find that he had accepted an offer of $38,000 from someone who had not even looked at the boat. Bugger! Kelly had wanted to make an offer when we were there. I stuffed up. Later in the week I checked to see if the sale had proceeded but the purchased was screwing him around, he gave him till the Friday to pay. He did this, so we missed the boat.
As it turned out, the new owner took it out for its first run and blew the compressor on one engine (they have a pressure injection system). For a while I thought the purchaser was going to want to sell as he contacted the seller for my number and we even spoke. However, he repaired it and decided to keep it.
 |
| The Marlin Broadbill we missed out on buying |
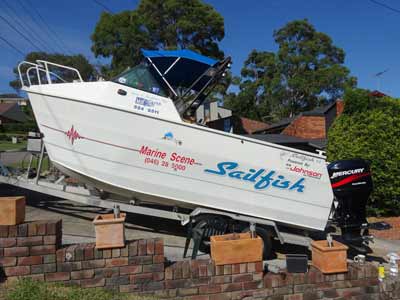
On Friday 11 March 2016 I checked various sites that sell boats. Even though I had set up automated notifications about Broadbill and Sailfish boats, I did not trust that they would work. I found a newly listed Sailfish 5.5 for sale in western Sydney. I contacted the seller and was told that he had agreed to sell to someone, but they were stuffing him around. He had given him till 3 pm today to come up with the money. He said if he did not turn up, he would call me. At 3:30 pm he rang and I went to his place to look at the boat. I spent 90 minutes looking at it.
The boat in size was almost identical in size to Le Scat. It was powered by two Mercury 75hp 4 strokes and the boat was on an aluminium trailer. It was a bit light on extras (no VHF, no sounder or GPS) and I knew that although the hull was very sound, overall it was not really in the greatest condition (as you will see later). I had already decided that I would not get caught out again, so I had brought some cash with me to put a deposit down if I thought it was suitable to replace Le Scat . The trouble was that Kelly was overseas and not due back till Sunday morning. I came to an agreement to purchase the boat for $38,000 with a chartplotter/depth sounder thrown in (but without the sonar module). The purchase was to be conditional on Kelly agreeing to the sale on Sunday. If we pulled out, he kept the $500 deposit. I figured it was worth the risk.
PURCHASING THE NEW BOAT
At lunch time on the Sunday I took Kelly to look at the boat. She agreed it was worth buying so we came to an agreement to purchase on the proviso that the seller changed the papers to himself (he had not changed from the previous owner) and add the Mercury motors to the registration papers (the boat had Johnsons before). He was to do this on the Monday and we would pay for it on the Tuesday (since we had to get the money out of an account on Monday). She also made me phone the new owner of the Marlin Broadbill to see if he was still thinking of selling. He said no (see later).
 |
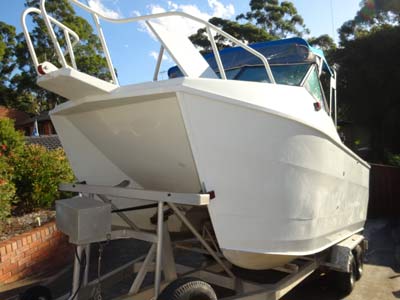
| Mak Cat when we first purchased her and after I removed all of the decals on the starboard side |
All this happened as planned and on Tuesday I went and collected the boat.
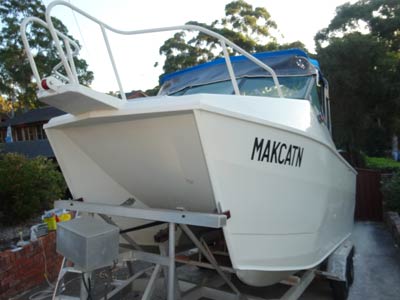
On Wednesday 16 March 2016 I went and transferred the ownership to me and renamed the boat Mak Cat. This is for M(ichael) A(nd) K(elly) Cat and also Mc(Fadyen) Cat. We also got personalised registration of MAKCATN. We had a proper renaming ceremony after the first dive we did.
As part of her agreement to buy, Kelly wanted some work done, including removal of the lettering all over the hulls (seems the boat was a demonstration model and the previous owner who was the first real owner had never removed them - hell I wanted them removed too) and then painted.
We also needed to put two new bollards amidships, an anchor bollard (none there!), transfer the ladder, scuba tank racks, radios, GPS, sounder and more from Le Scat. We also needed to put on bilge pumps as it had none (again, weird as it is not legal this way). Some of this I would do and the rest we proposed to get a bloke who lives around the corner from us to do (he does this professionally).
The day after we got the boat I started removing the decals, very hard as they are so old they ripped off in very small pieces, even after heating with a heat gun.
In late March, just after Easter, I had a phone call from the new owner of the Broadbill. He wanted to know if I would buy the boat!!! Even after I had asked him twice about this and told him I would happily buy it. Bugger, it was a much better (and bigger) boat than the Sailfish. Turns out he finally decided it was too big for him. On 24 May 2016 it was finally advertised for $45,000 on boatpoint.com.au. Assuming he drops a bit, a fair cost would be about $42,000 considering the work he did on the engine. It is still for sale as of 24 August 2016.
On 10 April 2016, we did our last dives ever from Le Scat. That afternoon I started removing items from her to transfer to Mak Cat. We also removed things to sell as we are going to scrap the hull. We removed the bin, seats, all the electronics, ropes, deco weights and things like first aid kit and spares. Two days later I removed the dive strap set up, the rest of the electronics (brackets, wires) and the anchor bollard. I also put the bin on Mak Cat to check its location and set up temporary dive gear holders to test how it works. I also moved the anchor and rope to the new boat and put the deco line and weight in place.
Over the next week I set up the electronics, put the ladder and anchor in, transferred the dive tank racks and more. Later I removed more things from Le Scat as I cleaned her up for disposal. I took her to the scrap yard on 28 June 2016, a bit over 23 years from when we first used her for diving. I figure we did about 1,300 dive trips from her, so close to 7,800 person dives. A very sad day for us! We got $570 for it (680 kg). I later took the fibreglass foredeck/cabin and the boat flotation to the tip, 120 kg worth, cost $58 to get rid of (thought it may be been a lot more). I sold the trailer for $800.
Since I bought an interest in her, we had spent something like $78,000 running the boat. Most of this related to fuel and also when we purchased new engines. However, it did not cost us anything like this to run as all of the fuel was covered by the people we took out diving.
REPAIRS AND MODIFICATIONS
The same day we purchased the boat I started work on the repairs and modifications we need to do to get Mak Cat to the standard we want and set up to let us dive safely.
Removal of Unneeded Items and Le Scat Items
The boat came with trolling outriggers, a bait board, a berley bucket and a ladder. As we do not need any of these I items, I removed them and put them up for sale on eBay. The bait board got $30 (but the buyer reneged so I have relisted it many times), the outriggers $325, the berley bucket $30 and the ladder did not sell first up but on the third go I got $51 for it!
Also we removed lots of things from Le Scat. I sold the two seats for $50. On 12 April I put Le Scat's engines on eBay and Gumtree as well as the anchor winch. I ended up selling both engines by 21 May for $2,000 each. I also sold the bow roller for $15, the fuel tanks for $50 each. Later I also removed, bilge pumps, rocket launchers, anchor winch and more. A lot of these things are still for sale.
Vinyl Decals
Both sides were covered by very ugly vinyl decals. These advertised the boat dealer who sold the boat (20 years ago!) and the engines and manufacturer. God only knows why these were still on the boat. These all need to be removed. I started the day I got the boat and over 6 hours that day and the next, I removed all the decals on the starboard side. The glue took even longer as it was still there after the decals were removed. In the end I had to purchase a product called Goof Off which removed the glue a lot easier than methylated spirits. It took me over a week (on and off) to do the starboard side.
I started on the port side on Thursday 24 March and it took me almost two full days to completely remove them. I finished on 30 March. This was all hard work, but it was worth it.
Hull Restoration
Kelly wanted to paint the hull so that the boat looked a lot nicer. After I finished removing the decals, I was able to get a quote for repainting the hulls. On 12 April the bloke up around the corner from us who does boat work came down to look at what we want to do. I took the boat to his place on 23 April for the painter to look at it and also for a quote on the other work. However, the price for painting the hulls ($3,600) was too much so we decided to not go ahead.
 |  |
Showing all the decals on the port side
just before I started removing them | The port hull after I sanded it but before polishing |
 |  |
| The starboard hull after the sanding | It is also nice and shiny |
 |  |
| Showing the registration numbers after polishing | The port hull after polishing, compare to top photo |
Instead, I used some cutting polish to test on the paintwork and it showed that the previously dull paint came up looking good, although it did not totally remove the shadows from the decals. I then purchased got some 800, 1200, 1500 and 2000 wet sandpaper and tried this on a section. After using this on a small section, it came up looking really good. I decided to do the entire hull, concentrating on the sections where the decals were. I would then use the cutting polish to do the rest of the hull, as well as the bits I did with the sand paper.
On 29 April 2016 I finished sanding and polishing the starboard hull and was very happy with the result. It did not take as long as I expected it would, about 2.5 hours to sand the hulls, then another 1.5 hours to polish the hull. As mentioned, I used cutting polish as the final stage. I will probably polish it again much later with normal polish.
On 5 May I finished doing the port side. The port hull ended up looking very shiny, although of course there are still lots of scratches. It all looks pretty good, excellent considering its age. I have purchased getting some aerosol white paint and when I get a chance I will test under the bow to see if I can touch up scratches successfully.
After doing this, I put the registration numbers on the bow (MAKCATN). We decided we do not need to get a proper name made as the rego is our name anyway.
Engine Hour Gauges
The boat did not come with hour gauges for the engines. I want to be able to easily keep track of engine hours, so some easy method of this is needed. I found some hour meters on eBay for $35 a pair delivered from China. They arrived within a week and were easy to install and hook up to the rev counters. They work very well.
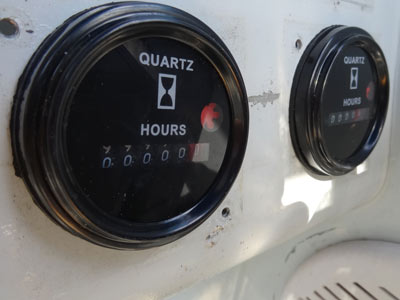 |  | |
| The new gauges | The PVC pipe bar I put on the rocket launchers |
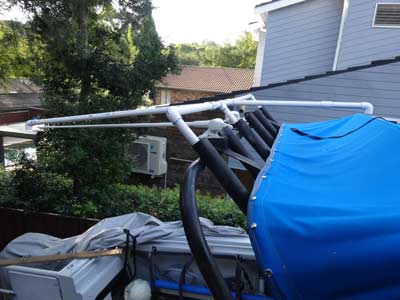
Boat Cover
I purchased a cover for the boat so that it was protected from the elements when parked at our house. We have a lot of trees around and Le Scat used to fill with leaves. To assist, I made up a bar from PVC pipe to sit in the rocket launchers. This was to keep the cover off the rocket launchers as when we were putting it on and off it used to catch on them and the aerial bases. It also protects the VHF aerial. It is a bit hard to put on, but I have worked out a way to do it by myself.
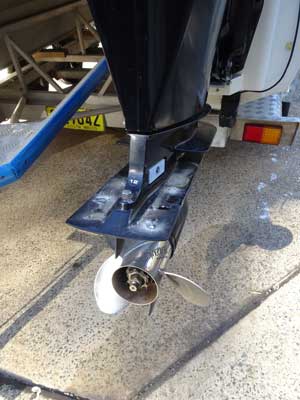
Engine Trim Tabs
The outboards came with Permatrim Trim Tabs. I decided to leave them on for a couple of runs and then take them off and see what difference was made. After the first two dive runs, I decided to remove as even a very minor change in the engine tilt made a big change to how the boat was running (port up or down etc).
 |  |
| The Permatrim trim tabs | The starboard engine after I removed the permatrim |
On 4 May 2016 I took them off, it was very easy to do. I will try to sell them on Gumtree.
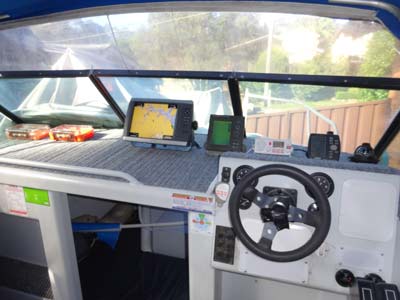
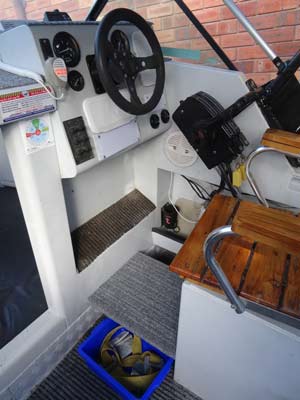
Chartplotter, GPS, Depth Sounder and VHF Radio
I removed all these items from Le Scat as the new boat does not have them. Even if it did, I would move the GPS and sounder as I am so used to how they work, I do not really want to work out the intrinsic details of how to read the new depth sounder. I also removed the 27 meg radio from the new boat as well as the three (yes three) aerials/bases and an old GPS aerial.
I put a new (but older model) chartplotter in the middle of the dashboard. It is a Garmin GPSMap 4012. This came with the new boat but had never even been taken out of the carton. It did not have any charts but I found some on eBay for only $28. I decided I would also purchase a depth sounder transponder for it later if I see it at a reasonable price. In mid-December 2016 I found Whitworths had it on special so I purchased it. This gives us 3D sonar.
I put the old depth sounder (Furuno LS6000) next to it. I installed the transponder from Le Scat on the rear right side of the starboard hull. This was about the only spot I could fit it anyway. It now works even when running at 20 knots, something it did not do on Le Scat.
On the right of the driver's seat, I put the old GPS, another Garmin, a GPS120. This is very simple but it is very good for navigating to dive spots.
I then put the VHF radio (Lowrance Link 5) in between the GPS and the depth sounder. I decided to not put it in the spot where the 27 meg radio was as it was hard to see the screen and push the buttons etc as it was behind the steering wheel. In addition, I could not find the brackets to fit into a space as I cannot recall where I put them!
I needed to drill a new hole in the dashboard for the wires to go through. Luckily my father-in-law dropped over the special drill bit to do one this big. I actually drilled a hole for the radio as well as another one for the sounder so that everything was not going through two holes. I then connected the GPS and chartplotter up to the radio so that we have the DSC (Digital Select Calling) features, including GPS data on the radio and the radio data will plot on the chartplotter (for example when I request the location of a friend via DSC).
 |  |
| The dash showing the electronics on Mak Cat and damaged carpet | The new gloveboxes and hole covers, compare to photo at left |
I also had to change the MMSI number over from Le Scat to Mak Cat so that the DSC part of the VHF would work correctly. You cannot do this on the AMSA web site, you have to phone them. It was relatively easy.
Later I got an NMEA cable so I could link the sounder to the chartplotter. I spent hours over a few days trying to get this to work without any success. I double checked all my wiring, comparing it to the manuals, but it still would not transfer data (waypoint, speed, course to sounder and depth and water temperature to chartplotter). I finally went online and did a search. Guess what? I found that the wiring diagram for the sounder was incorrect, with the wires for IN and OUT mixed up (as well as the fact they use non-standard terms for the +ve and -ve wires). As soon as I swapped the wires around, it worked!
I then tidied up all the cabling at the rear of the instrument panel, including removing some wiring that was no longer in use.
Dashboard
As well as setting up all the electronics on the dash, we removed the old marine carpet on the dash and replaced it with new carpet. This took a while as I then had to remove all the newly installed electronics and the mounts, cut the new carpet and glue it down using contact adhesive.
We also purchased two small dry boxes from Bunnings for about $20 each. I attached velcro to the bottom so that these will stick to the carpet. The boxes are used to store phones, keys etc and keep them dry.
Instrument Panel
The instrument panel had two large holes where some things had been removed, probably a sounder or GPS and something else. When I removed the 27 meg and AM/FM radios, this left more holes. I searched the internet and found a small compartment (actually a glovebox) made to fit a standard radio opening and another that would fit the larger of the other two holes. I installed the compartments which I ordered from a shop in Melbourne (Arnolds, excellent service, I have used many times over the years).
I had to grind out one a bit and cut out a small section of aluminium for the other. I also had to temporarily loosen the steering wheel so I could fit the glovebox in. Looks good. I later purchased a piece of white perspex and cut it to shape and screwed them over the other holes to make it neater.
 |  |
| The dash showing the new carpet | The new false floor after I carpeted
it showing the new weight bin underneath |
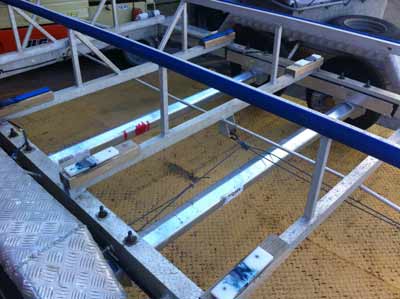
New Floor Section
When we were are sitting on the seats, the area in front where our feet rest was very low. My feet were at least 200 mm off the deck. I had two false floors installed here so that we can store things underneath and also make it more comfortable for us. I then carpeted it as well. This works well. I put two small bins under each one so we could store our weight belts. This again puts more weight forward.
EPIRB
The new boat actually had an EPIRB on it but I did not find it for five weeks. It was hidden in a small pocket inside the cabin. Not much use in there, especially considering it was still in its box and appears to have never even been opened. Luckily (as you will see below), the battery had expired in late 2014.
Our EPIRB on Le Scat was still legal, but the one on our yacht Catlypso had an expired battery (and was not a GPS one). Therefore I purchased a new EPIRB ($249, GPS model too) and put this on Mak Cat on the passenger side of the cabin. I moved the old Le Scat one to Catlypso.
Windows
The perspex (or whatever it was) in the windows was in very poor condition, especially the middle section. This was totally "crazed" and almost impossible to see through. The other sections were also bad, when the sun was low and shining on them it was hard to see anything.
I ended up buying three pieces of xxx for $80 from a local place and cut three replacement windows. It was hard work removing them, I had to drill out most screws as I doubt they have ever been removed before. It now looks great.
 |  |
| Looking through the middle section | One of the frames with new perspex |
 |  |
| The three sections back in place | Looking through the now clear windows |
Dive Gear Bin
Le Scat had a large aluminium bin on the rear deck which we used to store fins, masks etc when heading out for a dive. We also used it as a table for morning tea and also a seat when underway. It was also where were rested our tanks as we put them on. I removed it and put it on Mak Cat, but did not screw it into place for the first couple of dives as I needed to check its location is right. I also replaced a few of the rivets that hold the hinge in place and painted the bin with deck paint to match the other topsides of the boat.
After two dives, I bolted it into place. It works well here.
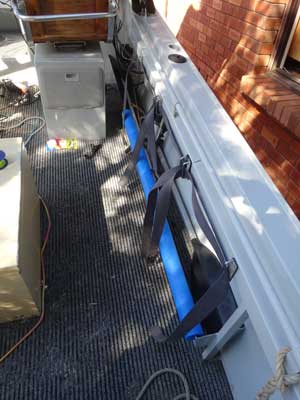
Dive Tank Straps
The fittings and straps that we used to hold our tanks in place on Le Scat were removed and used on the new boat. They are held on with pop rivets. We have space for six tanks, although we will only carry four or five divers.
 |  |
| The tank rack setup on starboard side | One of the new mid-ships bollards |
I also purchased some large swimming noodles (you know, the long hollow foam things). I cut these longwise through to the centre. I then put these over the lip of the aluminium pockets that run all the way on the inside of the hulls. This is to protect the tanks from rubbing on the aluminium. However, these push the bottom of the tanks out a fair bit, so I later removed and replaced with some edging trim I purchased on Ebay.
Bollards
Strangely Mak Cat did not have an anchor bollard. It was also missing mid-ship bollards. I removed the the anchor bollard from Le Scat and installed it. It was a tight squeeze to put the nuts on the bolts, but I did it eventually. I later purchased two alloy bollards and bolted them mid-ships.
Dive Ladder
I removed the existing ladder and sold it for $51 as it was not suitable for our purposes. I also removed the berley bucket and sold that. This was mounted on an aluminium plate which was welded to the transom floor and one of the transom side poles. I cut this off with an angle grinder and smoothed it off. I repainted the walk-through transom with deck paint once the holes where the old ladder was attached had been welded over.
 |  |
| The old laddder from Le Scat installed on Mak Cat | The painted transom |
Our dive buddy Leo made us a really good dive ladder about 20 years ago (or so, I cannot remember). It is so good, I moved it to Mak Cat, although I needed to modify the part that rests against the boat and holds it in place when it is being used. This is because the transom is not as thick as Le Scat's and unless we changed it, the ladder would hang almost vertically rather than at a bit of an angle. It took me a bit of thought to work out how to attach it as there was no real easy access to the inside of the back of the transom to let me attach the nuts. I ended up drilling some large holes underneath which enabled me to insert the nuts and hold in place with a ring spanner.
I ended up getting the welder to weld an extra 100 mm length on the brace part at an angle so that the ladder would sit as originally designed. I then added a piece of carpet on the end to protect the underside of the transom and to minimise the noise as the metal on metal made an awful noise when there was swell. This works well.
Transom
As mentioned there is a walk-through transom between the engines. There is a door between this and the back deck. However, when facing rear into waves and also when we stopped quickly, water came over the transom and into the boat. While this was never going to sink the boat, it was very annoying. The deck is generally sealed so that it does not go into the hulls.
This problem was caused by the extra weight of the four stroke motors over the two strokes that the boat was designed to use. These are about 80 kg heavier. See later about how I solved this problem.
After a few runs we identified a couple of ways to deal with this. The first was to close the door, but some water still came in under it. I purchased another pool noodle and cut a length to fit. I then put a split in it lengthwise and fitted it to the bottom of the door. This makes a very tight seal but the door can still be opened and shut. This means we need to close the door when stopped and open to exit and board the boat.
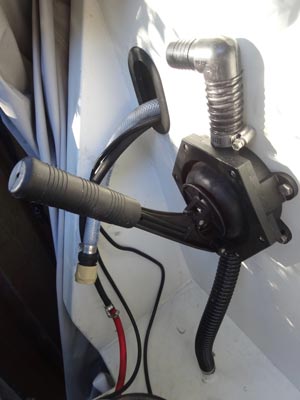
The second problem was that once the water is inside, how to get rid of it. We discovered that if the three bungs (in the rear wall above the floor but under the transom) are not in place, the water actually drains out quicker than any water that might come in through the bungs so long as there are not a lot of people at the stern. I also removed the bait tank pump and was going to put this on the floor but then discovered that it was not even connected. Well, what is making the noise when I flick the switch?
 |  |
| The bungs on the back deck | The port side hull manual bilge pump, the
hose coming out the hole is from the deck bilge pump |
It turns out there is another pump, up under the rear port gunnel. This was a deck wash. I removed the very long hoses connected to it and after shortening them, placed the intake on the floor in the corner and ran the outlet through to the outside. I then poured a bucket of water on the floor and switched on the pump. This quickly removed all the water. On the first use this removed the small amount of water that came in when the door was open. I later made some other changes (to the batteries as I will detail later) which basically stopped the water coming in through the transom door.
At the same time I took the very long hose off the bait tank scoop pipe. This pipe sits below the hull at the stern and directs water into the tank (which is under the passenger seat) when the boat is moving forward. I put a short section of hose on it and redirected this to the rear and down. I will later remove this pipe altogether.
Batteries
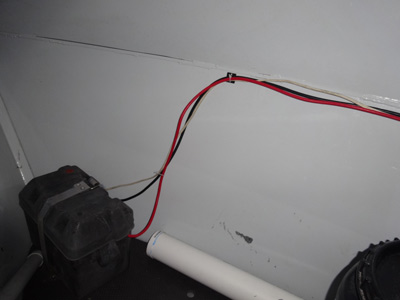
To assist with the stern heavy situation, I decided to move the two batteries (which weigh about 35 to 40 kg total) to the bow. This makes a negative difference of 70 to 80 kg at the stern, almost overcoming the extra weight of the four stroke engines (80 kg). To do this I purchased 10 metres of red and 10 metres of black 4 B&S cable and connectors via eBay.
 |  |
| The port side battery in its new bow location | The starboard battery in the bow |
On 30 May 2016 I installed the new cabling and moved the batteries to the bow. They now sit in the battery containers from Le Scat on rubber mats in each bow. The cabling seems to be more than adequate and the engines kick over easily. On 15 June 2016 I took Mak Cat out for a dive. It was amazing the transformation this made. The boat floated more level and I saw no water come over the transom, even when pulling up from speed. This has been the same for subsequent dives.
Bilge Pumps
As mentioned, the boat did not have bilge pumps and it does not even look like it ever had them. There are, however, aluminium pipes entering the stern section of each hull in front of the engines. These appeared to be to connect bilge pumps to. I had someone look at installing electric pumps, but it was very difficult to remove the rear section of floor as it is welded and there is no way you can access the rear part to remove. We looked at getting external electric pumps but the cost was $1,200 just for the pumps. We settled for manual pumps, but if I see some bargain priced electric pumps, I may purchase them.
Hot Shower
We have always had a hot shower after diving, whether it was a shore dive or a boat dive. On Le Scat, we used a 10 litre container filled with hot water inside a thermal bag. We put a watering can spout on the end of the pourer. We then had to lift this above our heads to shower. A bit of effort.
I had a spare pressure pump but with a low flow rate (from our yacht Catlypso). I installed this and connected it to some hose with a normal hose connection at the outlet end. I purchased a cheap dog wash hand shower and this plugs into the hose. We take the old hot water container and just put the pickup hose in it when we want to shower. I have a on/off switch at the stern so it can be controlled. The flow is not great, but more than enough. Magical!
Welding
We had some welding done, mainly to close some holes where bolts and screws had gone through the aluminium. There were a couple where the old depth sounder transponder was and a half dozen on the foredeck as well as two larger holes where radio and GPS aerials were located. As mentioned we also had two false floors welded in place in front of the seats.
Cabin
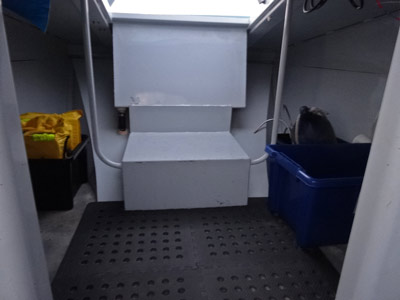
The cabin had a vinyl covered sponge mattress. Presumably this was in case were a midget and wanted to sleep on the boat overnight. Anyway, I removed the mattress as it would get wet when we pulled up the anchor after a dive and not dry out. I put interlocking rubber mats in the whole bow area. I also purchased three plastic bins to put things in, including our second anchor, two life jackets and things the divers will bring on the boat (dry clothes, morning tea etc).
 |  |
| The cabin showing the hatch out to the deck | The welded and painted foredeck |
Foredeck
As mentioned, we welded up some holes in the foredeck where various aerials were connected. I then painted it with deck paint. I also redid the bungee cords that closed the anchor well and the access hatch to the deck from the cabin. The gunnels along each side and the stern were also painted with the same deck paint. This paint was supposed to be grey, but really is more blue. Anyway, it looks okay.
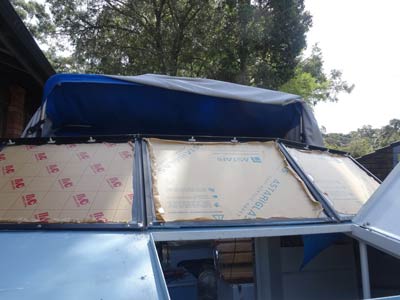
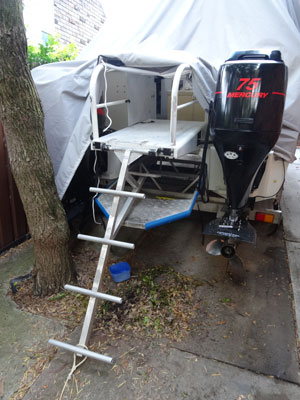
Canopy
The canopy is okay, but the section of aluminium pipe frame across the front was broken in the middle. When I pulled it apart it had a broken piece of dowl inside. I purchased a PVC pipe connector from Bunnings. This fitted exactly inside the pipe, very snug. When I put it back together it appears to have worked and after 10 dives it is okay.
Anchors, Ropes, Lines and Floats
Both anchors from Le Scat as well as the anchor rope were moved. We also moved over the deco line, the cross-over line, the mermaid line, mooring lines and a few other miscellaneous ropes.
Seats
Originally I thought I may move the seats from Le Scat as they appeared to be more comfortable. However, I realised they would not fit unless the whole base section was move. I ended up selling Le Scat's seats for $50 within 60 minutes of putting them up for sale (shows I severely underpriced them).
Trailer
The trailer had no spare wheel carrier (or spare wheel) so I had to buy a carrier ($40). I used a spare wheel from Le Scat for it. It also had badly adjusted brakes which I had to fix. On the right side at the rear, the plastic (or similar) material that directed the starboard hull up onto the trailer was missing. I had some material which I cut to size and attached by screws.
In addition, a couple of the tyres were in poor condition. I suspect that the original owner did not tow the boat far to the ramp so the tyres have suffered more from age than wear. I had three spare tyres and used a combination of these and better ones off Le Scat to ensure we ended up with five good tyres.
The electric winch needed some cleaning up to work, but it seems to run okay. It only has very short cables to connect to a battery, so I will put our 4WD battery in the Prado and then connect it via some jumper leads to the winch when we need to use it. Alternatively, I will carry a spare battery I have and use this. One the first attempt to use we got the boat half way up when the cabling fell apart. I can wait till later in 2016 to fix this as the boat ramp we use now is not crowded and we can drive the boat onto the trailer (I want to use a boat ramp at our yacht club which does not permit this).
I also changed the way the trailer safety chain was connected. It was a chain looped a couple of times over the trailer front and then attached to the tow bar. I used an existing hole (which probably originally attached the chain) and got a new bolt and washers for it. I then cut the chain to the right length and connected. I also drilled a second hole on the other side and attached a second safety chain.
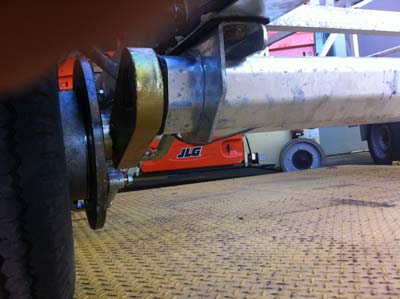 |  |
A closeup of the new front axle
showing the torsion suspension | The two new axles and suspension |
I also moved the stainless steel rod that we used to hook the winch onto the boat from Le Scat. Kelly's Dad had to shorten it a little and make a new hook as the old one was not wide enough to fit. The safety chain for the boat was a simple affair which was hard to do up. I drilled a new hole and moved Le Scatâs chain and adjustable turnbuckle to the new trailer. Much easier. We use the old safety chain as a third backup.
We also had a couple of other problems with the trailer that we knew about from the start. The suspension on the trailer is torsion rather than springs. These are totally different to normal trailer suspension. The main problem was that the front axle suspension was totally broken. When we went over a speed bump (for example), the front wheels came off the ground as the rear wheels went over the top of the bump. Also, the right front wheel was at a bit of an angle caused by a rusted bolt. This was also causing other problems to the right brake and wheel.
On 31 May 2016 I took the boat to a trailer repair place for a quote. I would normally replace it myself (as I did for Le Scat's suspension last year) but I have no idea about how it all works and also had a lot of trouble finding anyone selling the units. We got a quote for $2,571 to do both axles. This was not too bad considering the two axles and four new hubs (including brakes) cost $1,800 according to the quote. On 15 June the company measured the trailer up accurately as the axles need to be made to measure. This was installed 25 July. When they did this, they found a bit of corrosion around a couple of the bolt holes so they installed some angle aluminium as a reinforcement. It all looks great. This cost an extra $314.
Other Miscellaneous Items
I removed some broken things (plastic clips) as well as the plastic drawers in the driver's seat. This now gives us access to the whole of the inside of the seat mount for storage.
I moved over the flares, first aid kit, dive spares, a few bins, buckets and other items that we currently have on Le Scat. I also put in some clips to hold the dive flag and boat hook inside the cabin on the roof.
I also purchased two drink holders as there is no place to put a water bottle without it bouncing off the dashboard.
COST
The cost of the boat and modifications etc was as follows:
| Item | Cost | We sold some items from old boat and this one | Item | Sale Price |
| Purchase | $38,000 | | Engines | $4,000 |
| Welding, pumps | $1,100 | | Trolling arms | $325 |
| Boat Cover | $190 | | Seats | $50 | | |
| EPIRB | $240 | | Fuel tanks | $100 |
| Towball lock | $50 | | Ladder | $51 |
| Flares | $65 | | Burley bucket | $30 |
| Various items | | | Bow roller | $15 |
| Deck Paint | $44 | | Hull aluminium | $560 | |
| Pipe for cover | $ | | Old trailer | $800 | |
| Spare wheel carrier | $40 | | Ebay fee | -$199 |
| Bollards (x2) | $34 | | Foam/cabin dumping | -$58 |
| Waterproof containers (x2) | $40 | | |
| Small Bins (x2) and large bucket | $20 | | |
| Goof Off (glue remover) | $51 | | |
| Insurance | $602 | | |
| Trailer rego transfer | $47 | | |
| Boat rego transfer | $30 | | |
| Boat rego (personalised) | $176 | | |
| Boat labels | $11 | | |
| Gloveboxes | $83 | | |
| $ | | |
| New carpet and glue | $103 | | |
| Trailer repairs | $2,885 | | |
| Insurance | $602 | | |
| Signs | $10 | | |
| Battery wire | $121 | | |
| TOTAL: | $43,637 | | TOTAL: | $5,684 |
| FINAL COST: | $37,953 | | |
Click here to read about the boat itself.
|  v6.00.307 © 2003-2005

