|
Michael McFadyen's Scuba Diving - Tasman Hauler
The far south coast of NSW is a quite beautiful location, with the national parks and coastline the major attractions to the huge numbers of tourists who visit the area. The diving in the area is exceptionally good, with pristine reefs and generally very good visibility. As well as the reefs, there are numerous shipwrecks in the area, including NSW's largest remaining wreck the Empire Gladstone, the Ly-Ee-Moon, the City of Sydney, the New Guinea and many others.
As well as these wrecks, there are two vessels that were deliberately scuttled for diving purposes. These are the Henry Bolte and the Tasman Hauler.
The Tasman Hauler was built by Evans Deakin and Co. Ltd of Brisbane for BP (Kwinana) Pty Ltd. Launched in November 1959 as a firefighting tug, it was originally named the BP Cockburn and was registered in Fremantle. The BP Cockburn was 419 tons and measured 42.4 metres long overall and 10.0 metres wide. Powered by an eight cylinder diesel motor of 1,500bhp connected to the prop by flexible couplings (identical to the Henry Bolte), in 1975 the BP Cockburn was sold to P & O Australia Ltd and renamed the Cockburn.
Leased to Kwinana Towage Services, the Cockburn changed hands again in 1983 when it acquired the name Tasman Hauler and was purchased by Lease Industrial Finance and Phipson Nominee Pty Ltd. The vessel was now registered in Sydney and leased by Charter Craft and Marine Services Pty Ltd of Eden. In 1986 this company purchased the Tasman Hauler which meant that as of about 1987, Charter Craft and Marine Services owned both the Henry Bolte and Tasman Hauler.
 |  |
A photograph of the Tasman Hauler
on a slipway at an unknown date | Another photograph of the Tasman Hauler at an unknown date |
On 6 July 1988, the Hauler was stranded on rocks at Twofold Bay (presumably after dragging or breaking its mooring). She was refloated and was apparently declared a total loss. The Hauler must have had a fire around this time as the lower forward compartments appear to have been burnt at some time.
The Tasman Hauler and Henry Bolte were purchased by the then Eden dive operator, Gary Becus, for $1 each. I am not sure if this was before or after the stranding mentioned in the above paragraph. On 1 October 1988, he sank the Tasman Hauler and around the same time the Henry Bolte just south of Red Point off Ben Boyd National Park to start artificial reefs and to provide alternate wreck dives for his divers. Located only a few hundred metres apart, it is less than a 10 minute run south from Eden across Twofold Bay to either tug.
Once out of Eden Harbour, head out across Twofold Bay towards the southern headland (where you can see Boyd Tower) and then down the coast a few kilometres till you reach 37° 06.5561' S 149° 57.8230' E (using WGS84 as datum - if you use another see my GPS Page). The marks at left will help you find the wreck, but there is normally a mooring on this site. See GPS and Marks Page for a more detailed description of the marks.
On 28 January 1989 I dived the Tasman Hauler and although it had only been down about six months, the growth and fishlife were quite incredible. Despite returning a number of times to Eden in the year after, I did not dive this wreck again or the Henry Bolte until 1993 due to inclement weather.
 |  |  |
| Western Mark | North-western Mark | A drawing of the Tasman Hauler
I did in 1993 - it is still the same
© Michael McFadyen
Click to enlarge |
Although only 1.7 metres longer than the Henry Bolte, the Tasman Hauler appears to be a much larger vessel as soon as you see it on your descent. The Hauler has changed dramatically since my first dive on it in 1989. The only deleterious impact of the sea that I noticed is the fact that all the timber decking (that overlaid the steel deck) has been eaten away by worms and that some of the upper railings are now paper thin or have disappeared altogether.
However, the major change to the Tasman Hauler in the past seven years has been the massive growth of sealife all over the vessel. Apart from where traces still remain of anti-fouling below the waterline, a prolific amount of invertebrate life covers almost every inch of the ship. Lace coral, jewel anemones, sponges, soft corals and small gorgonias abound. The colours are brilliant, especially those the of the jewel anemones. Even if you are not interested in wrecks, a dive on the Tasman Hauler is a must just to see the marine growth. NOTE: In October 2005 there was very little growth on the wreck and almost no jewel anemones - I assume a storm stripped it off. As well as the fixed life, a good deal of fishlife can usually be found on the wreck. In addition to the usual bream, yellowtail, black reef leatherjackets, six-spined leatherjackets, red and striped morwong and trevally, you often get schools of yellowtail kingfish circling the upper parts of the wreck.
The Tasman Hauler is still fully intact (except as advised above) and lies with a slight list to the starboard. The depth goes from 15 metres on the top of the mast down to just over 30 metres on the sand near the prop. The bridge area is 20 metres, the main deck is 23 to 26 metres and the inside of the engine hold is 28 metres.
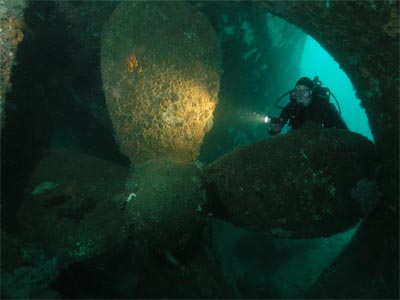 | 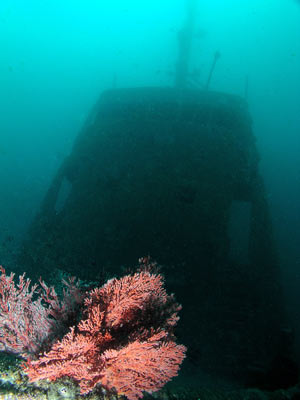 |
| Kelly McFadyen and the prop of the Tasman Hauler | A nice gorgonia on the bow with the Bridge in the background |
A good starting point for an exploration of the wreck is to go to the propeller which is huge, more than three metres across. You can swim through the prop (it is surrounded by a shroud that directs the thrust as the prop itself swivels as there is no rudder). This gave the tug extremely good maneuverability. There are normally a lot of leatherjackets in this area.
From here, ascend to the stern (notice how the hull is basically bare of growth below the old waterline where the anti-fouling was applied) and enter the rear hold. This is quite compact but two divers can easily get inside without any problems. There is not much to see, but do it anyway.
Forward of here there is the engine room. You can drop down through the very large engine access hatch which is at least five metres by four metres in size. There is a lot to see here but it is very dark once you get away from the hatch, you will need a torch). The gearbox can be see straight below you and forward of this is the enormous diesel engine. There are eight cylinders, easily identifiable. On either side of the engine there are other pieces of machinery etc. At the front of the engine there are more things to see, including electrical boxes, valves, pumps etc (on a funny note, on the 1998 Australia Day Weekend there was a scuba diving doll attached by cable ties on the front, port side of the engine).
 |  |
| The engine of the Tasman Hauler | Jewel anemones on a wire inside the Hauler's superstructure |
At the front of the engine there is a ladder/catwalk that gives access from the engine room to the area below the bridge. It is a bit of a squeeze, but unless you are quite large, you should be able to make it through. This brings you to the main deck level. There are two corridors, one on either side of the ship. You can take either door from here and explore the deck or exit to the rear through doors that open onto the main outside deck. Towards the bow there are a number of ways you can leave this level. You can swim right through the main room and exit out the large door like hole (actually not a door) onto the bow, drop down through another hatch to the living compartments or ascend through a hatch to the lower bridge level.
For now, drop through the hatch and you will see a corridor running forward and rooms on either side of this corridor. These rooms used to be the living areas and there appears to have been a fire, at least in the forward port side room. After examining both sides, go to the forward part of the corridor and you will see a hatch above you. Ascend through the hole and you will find yourself immediately in front of the bridge, on the bow.
Before returning to the bridge, go right to the bow and drop over for a quick look (if you have a camera or video, take a shot from here of the bow and the impressive bridge).
You can enter the bridge on the level above the main bow deck through one of the windows or by going through the doors on either side and then through the doors into the bridge. There is another level of bridge above this one.
The Tasman Hauler has a very impressive upper superstructure that used to house firefighting equipment. This is now home to the most incredible array of jewel anemones I have ever seen. They are on the railings (what's left), ropes and wires, the underside of the deck of the superstructure and on the mast. The colours include red, green, pink, orange, yellow, white, purple, brown and mauve. Fantastic for photography and video. Make sure you keep air and time for this pure hit of enjoyment.
The wreck of the Tasman Hauler is one of the most enjoyable dives I have ever done, both in Australia and overseas. This dive is for the more experienced, although open water divers under close supervision could stick to the upper parts of the wreck. Visibility on the Tasman Hauler is usually very good and better than the Henry Bolte.
Divers using dive computers will find themselves at a distinct advantage when diving both this wreck.
The only way to dive this location (unless you have your own boat) is by Merimbula Divers Lodge who can provide accommodation as well as boat services. I can really recommend their attention to all your needs.
References:
Wrecks on the New South Wales Coast by Jack Loney page 158
Lloyds Register 1961-62, 1979-80, 1985-86, 1988-89
The Ships that Serve Australia and NZ (Vol 1 Ed 1 - 1975) by R.D. Fildes page 33-34
The Ships that Serve Australia and NZ (Vol 1 Ed 2 - 1983) by R.D. Fildes page 109
|  v6.00.307 © 2003-2005

