|
Michael McFadyen's Scuba Diving - Shinkoku Maru
The second largest wreck in Chuuk Lagoon is the 10,020 ton oil tanker Shinkoku Maru. Sitting upright on the sandy bottom, the Shinkoku is a wreck that can be dived by anyone, its depth ranges from 11 metres on the bridge down to 39 metres near the prop. Being so large, this is one wreck that can be dived many times. I would suggest that a minimum of two dives should be made to adequately see the vessel.
The Shinkoku Maru was completed on 13 December 1939 by Kawashi Jyuko Co. of Kobe for Kobe Sanbashi K.K. (Kobe Pier Co. Ltd). It was 150 metres long and 20 metres wide and was requisitioned by the Japanese Navy in 1941, four weeks before Pearl Harbour. There is no mention of the ship in any Lloyds Register. The Shinkoku Maru was one of eight oilers that refuelled the Japanese fleet that attacked Pearl Harbour.
From 1939 to 1940 she was chartered by Kawasaki Kisen for oil transport services.
 |
| The Shinkoku Maru |
On 18 August 1941 the Shinkoku Maru was requisitioned by the Imperial Japanese Navy and commissioned in the IJN as a Converted Merchant Transport (Oil Supply) in the Kure Naval District. On 25 August 1941 conversion to a naval auxiliary began at Naniwa Dockyard, Osaka. On 5 September 1941 Captain Ito Tokutaka was appointed Supervisor of the work. On 24 September 1941 the conversion was completed.
On 27 and 28 October 1941 the Chief of Staff 1st Air Fleet, Rear Admiral Kusaka Ryunosuke (41) arranged for oilers Shinkoku Maru and Toho Maru to join the 1st Air Fleet by about 10 November. In the meantime, the two oilers were equipped for refueling while underway.
On 30 October 1941 the Shinkoku Maru is advised by Rear Admiral Kusaka that when installation of gear for refueling and preparations for action have been completed, she is to depart Sasebo on 13 November 1941 and proceed to Kagoshima Bay on Kyushu. Further, she is to conduct refuelling exercises with the 1st Air Fleet's carriers while enroute. Kusaka requests the oiler's Commanding Officers to load fuel oil for refueling purposes before their departure.
On 10 November 1941 the Chief of Staff of the Kure Naval District advises Rear Admiral Kusaka that arrangements have been made to equip Shinkoku Maru for simultaneous port and starboard refuelling by 13 November 1941.
On 13 and 14 November 1941 the Shinkoku Maru is on her way to Kagoshima Bay. While enroute, together with oilers Kyokuto Maru, Kenyo Maru and Kokuyo Maru conduct refuelling at sea exercises with CarDiv 1's IJNS Akagi, CarDiv 2's IJNS Soryu and IJNS Hiryu and CarDiv 5's IJNS Shokaku and IJNS Zuikaku, CruDiv 8's IJNS Tone and IJNS Chikuma and DesRon 1's light cruiser IJNS Abukama and her destroyers.
On 18 November 1941 the Shinkoku Maru was made part of Operation "Z"- The Hawaii Operation (the Pearl Harbor attack). She departed Saeiki for the Kuriles. Seven oilers were assigned to Operation "Z", but the IJN's practical experience in refuelling at sea is almost nil. Earlier in the month, three refueling exercises were held in Sukumo Bay and the Ariake Sea. Now, while enroute to the Kuriles, all units in the carrier formation are refuelled ten times.
On 26 November 1941 the ships departed Hitokappu Bay, Etorofu Island, Kuriles for Hawaii. On 2 December 1941 they were 940 miles north of Midway Island. The Striking Force received the coded signal "Niitakayama nobore (Climb Mt. Niitaka) 1208" from the Combined Fleet. It signified that X-Day hostilities will commence on 8 December (Japan time). On 4 December 1941 the weather conditions worsened and rough seas caused the Striking Force's ships to roll up to 45 degrees. Refuelling was cancelled. On 5 December 1941 they were 600 miles north of Oahu, Hawaii. At about 11.30 am, after fleet refuelling was completed, three of the 2nd Supply Group's oilers and a destroyer were detached from the Striking Force and turned towards a designated rendezvous point with the carriers for their return trip to Japan.
On 6 December 1941 the force was 400 miles north of Oahu, Hawaii. At 6.30 am, the entire Striking Force engaged in its final refueling. At 8.10 am, after refuelling is completed, the 1st Supply Group's oilers, including the Shinkoku Maru and a destroyer are detached and turn north towards a designated rendezvous point with the carriers for the retrurn trip to Japan.
At 6.18 am on 7 December 1941 the Carrier Striking Force launched attacks on Pearl Harbor, Hawaii.
On 23 December 1941 Shinkoku Maru arrived at Hashirajima. On 8 January 1942 she arrived at Kure.
On 20 January 1942 she became part of Operation "R" - The Invasions of Rabaul and Kavieng. On this day she was north of New Ireland, New Guinea. There were numerous aircraft carriers, cruisers, destroyers and transports in the force. Over 100 bombers and fighters were launched to attack Rabaul, New Britain and Kavieng, New Ireland.
On 21 January 1942 another strike is launched on Rabaul, Madang, Lae and Salamaua, New Guinea. The next day a 45 plane strike against Rabaul is launched. When the aircraft are recovered, the Carrier Striking Force headed north for Truk.
On 23 January 1942 the invasion forces landed at night, swiftly overcome light Australian opposition and occupy Rabaul and Kavieng. Shinkoku Maru is part of the Operation "R" Naval Force and she refuelled the naval units.
On 31 January 1942 the Shinkoku Maru provides refuelling support for the invasion of Ambon Island, Netherlands East Indies (now Indonesia). After the invasion starts, the Shinkoku Maru departs the area. On 4 February 1942 she arrives at Tokuyama. The same day, the occupation of Ambon is completed. On 7 February 1942 she arrives at Kure. It is not clear where the ship was for the next month. On 2 March 1942 she arrived at Kanogawa and on 7 March 1942 at Kure.
On 18 March 1942 she arrived at Staring Bay (now called Staring-baai off the south-east peninsula of Sulawesi in Indonesia). This is where a lot of aircraft that attacked Darwin in Australia on 19 February 1942 flew from.
ON 26 March 1942 the Shinkoku Maru is part of Operation "C" - The Raids into the Indian Ocean. She departed Staring Bay with the oilers, carriers, cruisers and destroyers as part of Supply Group No 1. After air attacks on the British naval bases at Columbo and Trincomalee, Ceylon (Sri Lanka), they departed the Indian Ocean Area for Japan.
On 22 April 1942 the Shinkoku Maru arrived at Kure. It is not clear where she was for the next month as on 26 May 1942 she arrived at Hiroshima Wan.
On 29 May 1942 Shinkoku Maru departed Hashirajima as part of the Battle of Midway force. On 6 June 1942 the Shinkoku Maru (together with the Rio de Janeiro Maru - also a Chuuk Lagoon wreck) was one of the support vessels for the Japanese submarine fleet involved in the Battle of Midway.
On 13 June 1942 she arrived back in Japan, at Yokosuka. She then went to Ominato on 28 June 1942 and on 13 July 1942 she arrived at Kure. It is not clear what she did in this one month period.
On 7 August 1942 the US Marines, assisted by Australian and New Zealand ships, invaded Guadalcanal, British Solomons (now Solomon Islands). On 10 August 1942 the Shinkoku Maru was assigned to the Guadalcanal Transport Replenishment Unit to transport heavy oil from Balikpapan, Borneo, Palembang, Sumatra and Singapore, Malaya to Truk to support the Striking Force. Balikpapan oil refinery is located on the shore of Balikpapan Bay. It was established in 1922 and is the oldest refinery in the area. It was obviously in operation at this time but later it was destroyed by the Allies (and re-built in 1950). On 11 August 1942 she departed Hiroshima Bay.
On 17 August 1942 the Shinkoku Maru was in convoy with tanker Nichiei Maru north-west of Truk. About noon, the Shinkoku Maru was attacked by USS Gudgeon (SS-211). The submarine's skipper, Lieutenant Commander William S. Stovall claimed three hits on Shinkoku Maru and two hits on Nichiei Maru during a submerged attack. However, both tankers suffered only light damage. Possibly, one or more of the Mark-14 torpedoes that hit the tankers were duds.
On 28 August 1942 she was back at Truk. Temporary repairs to the damage are completed, perhaps by repair ship IJNS Akashi. She departed with Nichiei Maru. On 4 September 1942 she arrived at Kure and underwent repairs. On 16 October 1942 she departed Kure, probably for repair trials. This indicates that there was a fair bit of work to repair. On 17 October 1942 repairs were formally completed.
On 22 January 1943 the Shinkoku Maru departed Balikpapan for Truk, presumably with a load of fuel. On 18 March 1943 she arrived back in Japan at Yokohama. On 20 March 1943 she departed and two days later she arrived at Kure.
On 3 April 1943 she departed Kure and ended up in Tokuyama arriving there on 28 April 1943. It is not known where she was for the almost four weeks. She left on 3 May 1943 and eventually ended up in Singapore. At 3 pm on 19 May 1943 she departed Singapore. Presumably this was on the way back from somewhere On 29 May 1943 she arrived at Genzan, Korea. She left on 1 June 1943. On 4 June 1943 the Shinkoku Maru arrived at Moji and three days later departed. On 10 June 1943 she arrived at Mako and again, three days later she departed.
On 30 June 1943 she turned up leaving Singapore for Truk via Davao and Palau. It is not known where she was for the almost three weeks. On 1 July 1943 she diverted to Rabaul instead of Truk.
On 7 July 1943 at about 5 pm, the Shinkoku Maru was attacked by USS Peto (SS-265) at N0º 37' E148º 6'. Lieutenant Commander William T. Nelson fired three torpedoes and claimed two hits in a submerged attack, but the Shinkoku Maru is actually hit by only one torpedo in the bow. It flooded fuel oil tank No. 2 holding 1,400 tons of light oil.
The USS Peto torpedoed the Shinkoku on 7 July 1943 but it was repaired at Singapore and was operational again by 15 August.
On 9 July 1943 the Shinkoku Maru arrived at Rabaul. On 16 July 1943 she left Rabaul with an unidentified escort (for two days) enroute to Surabaya and Singapore. On 20 July 1943 she is assigned to the Striking Force. On 28 July 1943 at Surabaya, Captain Ohashi assumes command. She then headed to Singapore where she underwent repairs at Seletar Naval Base by the No. 101 Repair Unit. These are completed on 15 August 1943.
On 30 August 1943 the Shinkoku Maru arrived at Kure. On 5 September 1943 she left Kure and the next day arrived at Sasebo. Later the same day she departs for Truk. On 9 September 1943 at N5º 00' E150º 00' the Shinkoku Maru rendezvoused with destroyer IJNS Tamanami which was escorting the Toa Maru (this is not the ship sunk at Gizo, that is the Toa Maru No 2) out of Truk. The Tamanami is detached from Toa Maru and began escorting Shinkoku Maru. On 11 September 1943 they arrived at Truk.
It was also thought possible at one time that the Shinkoku Maru was attacked in Singapore Harbour by Australian commandos on 26 September 1943 who used the famous vessel MV Krait to clandestinely enter the harbour and attack Japanese ships. It is reported that a vessel resembling the Shinkoku Maru was attacked by placing three limpet mines on the prop shaft, three on the port side of the engine room and three on the starboard side of the engine room. However, there were a large number of Shinkoku class oil tankers built and it may have been one of them that was attacked as the Shinkoku was in Truk on that date.
In November 1997 when I visited Chuuk Lagoon I tested this theory by checking around the port and starboard sides of the engine room. Despite the heavy coral growth you can see the plates of the hull. There does not appear to be any obvious damage that may have been repaired, especially as an interim measure. It would therefore appear unlikely that the Shinkoku Maru was the vessel attacked in Singapore by the Australian commandos from the Krait.
On 27 September 1943 the Shinkoku Maru departed Truk with fleet oiler IJNS Hayatomo. On 1 October 1943 they arrived at Palau escorted by destroyer IJNS Asanagi. From here the Shinkoku Maru obviously headed back for Japan as on 16 October 1943 she departed Sasebo.
On 21 October 1943 she departed Kure and on 28 October 1943 she arrived at St Jacques, Indochina (now Vung Tau, Vietnam). On 31 October 1943 she left St Jacques and on 7 November 1943 arrived at Singapore. The Shinkoku Maru left three days later and on 14 November 1943 she arrived at Balikpapan. Presumably she collected a load of fuel from the oil refinery. Later that day, she departed for Truk with Nippon Maru, Toa Maru and Nanpo Maru escorted by the destroyers IJNS Hibiki and IJNS Hamakaze.
On 22 November 1943 they arrived at Truk. On 7 December 1943 the Shinkoku Maru departed Truk in convoy 7072 consisting of the tanker Fujisan Maru (now also sunk in Chuuk Lagoon) escorted by the destroyers IJNS Tamanami and IJNS Shimakaze and possibly an unidentified escort. On 11 December 1943 the two destroyers detached at longitude 135 degrees to meet another convoy. Later the two tankers arrived at Palau.
On 13 December 1943 the Shinkoku Maru departed Palau in convoy 2515 consisting of tankers Fujisan Maru, Ogura Maru No 3, Hakubasan Maru and small cargo ship Shoyu Maru bound for Tarakan. The Shinkoku Maru and ammunition ship Aratama Maru were bound for Balikpapan escorted by patrol boat No. 2 and auxiliary subchasers CHa-26 and CHa-27. At 5 pm on 17 December 1943 subchaser CH-6 joins the escort. At midnight, the subchaser and the Tarakan-bound ships split away from the convoy. At 10.45 am on 19 December 1943 the Shinkoku Maru arrived at Balikpapan. Presumably she took on a load of fuel.
On 22 December 1943 she arrived at Surabaya. Two days later she departed Surabaya for Balikpapan to load aviation fuel for Rabaul with subchaser CH-3 as escort to the south tip of Laut Island. Very early on 29 December 1943 she arrived at Balikpapan. Then, at 0800, Shinkoku Maru departed for Truk via Palau with Akebono Maru and Fujisan Maru escorted by patrol boat No. 102. On 2 January 1944 Patrol Boat No. 102 is detached from the convoy which steams on temporarily unescorted.
At 0328 on 3 January 1944 the Akebono Maru was torpedoed by USS Raton (SS-270) in a surface radar attack at N8º 22' E129º 52'. Lieutenant Commander James W. Davis was the skipper of the submarine. The ship remains afloat, damaged but still underway. At 11.30 am IJNS Hayanami and IJNS Uzuki joined the convoy from Palau. Hayanami escorted the Akebono Maru to Palau separately while the Uzuki and the other two tankers steamed ahead to Palau. On 4 January 1944 they arrived at Palau. On 6 January 1944 the Shinkoku Maru departed Palau and on 10 January 1944 arrived at Truk still in convoy.
On 19 January 1944 the Shinkoku Maru departed Truk, probably with Fujisan Maru and an unknown escort. On 27 January 1944 they arrived at Tarakan. On 29 January 1944 they departed Tarakan at 1930 in convoy with destroyers IJNS Shigure and IJNS Harusame as escorts. On 31 January 1944 they arrived at Balikpapan.
On 3 February 1944 the two tankers departed Balikpapan in a convoy with cargo liner Amagisan Maru escorted by destroyers IJNS Shigure and IJNS Harusame.
On 10 February 1944 they arrived at Ulithi Atoll (in the Caroline Islands) and one or both of the tankers unload some fuel. The next day at noon the convoy departed. On 14 February 1944 they arrived at Truk.
It is believed that the Shinkoku Maru was hit amidships by one bomb dropped by the Douglas Dauntless dive bombers of the carrier USS Yorktown on 17 February 1944. The next morning, six torpedoes were fired at the ship by planes from the USS Bunker Hill but they all missed. Later the same day, Grumman Avengers from an unknown aircraft carrier sunk the Shinkoku Maru in a torpedo attack that opened a large hole on the port side and flooded the engine room.
However, in an email to me, the author of Hailstorm over Truk Lagoon, Klaus Lindemann, advised me that since he wrote his book, some Japanese veterans from the Shinkoku Maru gave him a vivid description of the attack on the boat. They told him that it was during the night when they were hit, in the small hours of the second day. This makes it certain that the Avengers of the USS Enterprise were the ones who dropped a close miss on the port side near the engine room and opened the hull. The damage is consistent with a bomb near miss as torpedo damages look different (they are generally much larger).
The ships masts originally stuck up out of the water but they were blown off at some time. The ship was "discovered" by divers in December 1971.
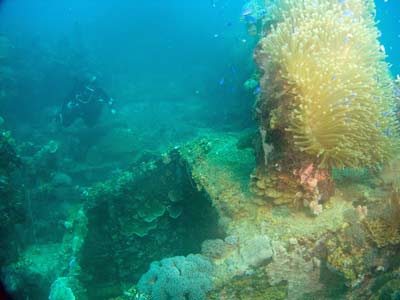
Some of the more interesting parts to see of the Shinkoku Maru are the bridge area, the crew accommodation areas, the engine room and the engineering areas behind the bridge as well as the large deck.
A GPS Reading of N7° 24' 00.4" E151° 46' 44.8" using WGS84 as the datum will put you on the bridge. The dive boats generally anchor on the bridge providing an excellent central point from which to begin your explorations.
It is hard to see how the dive guides can find this wreck as it is a long way from land and there is only one good mark that can be used to locate the wreck. When I first dived this wreck back in 1991, I asked the guide how they found the wreck. He said "you smell". Now he was not making a comment about me, he was imploring me to use my nose. Sure enough, I could smell oil. "Now you look" he said. Scanning the water I could see a very slight film of oil on the surface. The guides knew where this oil was coming from and could then look for the bridge and kingpost under the water and anchor on the bridge.
Even today in 2011 oil is still leaking from the wreck. However, unlike the wild claims made on an Australian Broadcasting Corporation (ABC) television show in 2011, there is no danger to the reefs of Chuuk Lagoon from the oil in the wrecks as the three oil tankers sunk here (Shinkoku Maru, Fujisan Maru and Hoyo Maru) were all empty when sunk and half the ships are coal-burning steam ships. The remainder of the ships obviously had some oil in their bunkers, but it could be expected to be not that much as many of the ships were under repair and would not have been refuelled.
 |  |
The Shinkoku Maru prop and rudder
Photo by Kelly McFadyen | The funnel of the Shinkoku Maru | |
This is a huge wreck, so to see it completely you will need two dives. However, you can get a very good understanding of the wreck and see the best bits on one dive. On the first dive here, swim towards the rear as the majority of the best bits are this way.
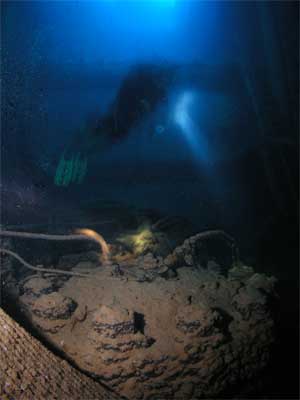
From the dive boat, start heading towards the stern even before you descend to the wreck. You should be able to see the kingpost which is located a short distance behind the bridge superstructure. Gradually drop to the deck which is at about 25 metres. It will take about five minutes to get near the rear superstructure area.
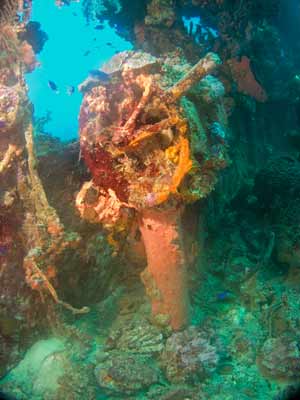
As you pass the funnel, you can get some good photographs. There is a stern gun on the rear deck and you can also get some nice photographs of it. Drop over the stern if you want to see the propeller and rudder. It is just under 40 metres here. The prop is quite large, but a lot is buried under the sand. Once you have examined them, swim along the port side, gradually ascending a little.
 |  |
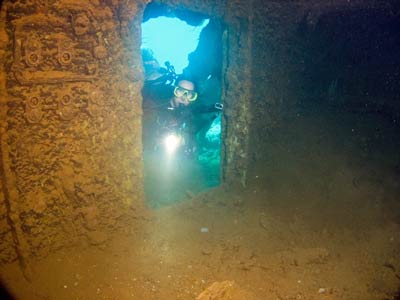
| Kelly entering the engine room through the torpedo hole | The engine room of the Shinkoku Maru |  |  |
| The engine of the Shinkoku Maru | Another photo of the engine room |
After about 20 or so metres you will see the hole caused by the bomb. This is not huge, but you can easily enter through the hole to the engine room. Swim into the hole and you will now be in the engine room. This is a huge engine room, one of the roomiest that I have ever seen. The large engine has lots of space above it and this enables lots of divers to be in there at any one time.
Have a quick look around and ascend to the upper levels of the engine room and exit through the port or starboard doorway into the rear compartments or via the skylights (only one seems to be open). In the superstructure you will see more interesting things (baths, toilets). Return to the deck through the forward doors.
Start heading towards the bow. Along the way, keep an eye out for human remains and other artefacts. Continue on towards the bridge, zigzagging across the deck as you go. Behind the bridge on the port side is a small hut like object that gives access to the engineering areas. There are also a number of other access holes nearby. Make sure someone stays on the deck as you and your buddy enter the hole. Down you drop, deep inside the bowels of the ship, past ladders and catwalks until you reach the bottom at 33 metres. There are huge pressure gauges and valves all over the place, but be careful as there is a thick layer of silt on the bottom. Return to the deck.
 |  |
| Kelly exiting the engine room via the skylight | Another of the baths, I think this is at the stern
Photo by Kelly McFadyen |
 |  |
| A bath in the bridge area of the Shinkoku Maru | Kelly on the forward mast examining the soft corals |
Along the deck there are other hatches, some of which are open. These give access to the oil tanks which are empty. I have entered at least one of these but would not recommend that you do it. The reason is that not only are they empty, they are very dark and also still have a coating of oil sludge that if you touch will goo up your dive gear.
Below the bridge are crew cabins and other compartments. There are many ways to enter these areas as there are plenty of access doors. To end the dive, explore the area below the bridge. Here there is a lot to see, including the hospital room (with operating table with bones and artefacts resting on it), urinals, toilets, baths, sinks and galley (together with heaps of cooking utensils). There are also radios, batteries and more to see.
 |  |
Jessica McInnes pretending she is at work
and assisting in an operation | Some bones near the operating table
Photo taken 1991 using Nikonos IV - scanned 2011 |
Ascending to the top of the bridge you will see three telegraphs (I thought there should be a fourth one but it was not there), the steering binnacle and the compass. Right on the top of the superstructure there are more artefacts, including lights, first aid kits, pots, pans and other items.
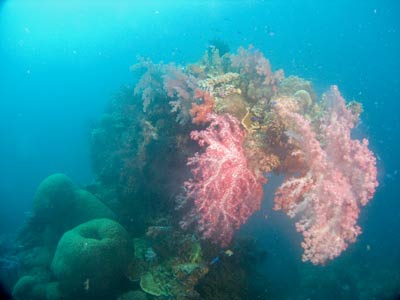
The various levels of the bridge range in depth from 15 to about 21 metres. This is about all you will see on one dive. Doing this dive I took about 33 minutes to get to here and had one minute of decompression to do (I went to the prop and engine room and it was the second dive of the day). If possible, do your ascent via the forward mast as it is covered in very colourful soft corals and you can get some brilliant photographs.
 |  |
| A telegraph on the bridge | Another of the telegraphs |
 | 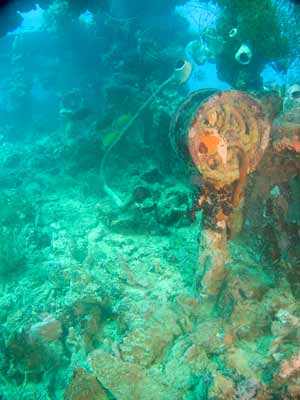 |
| Yet one more telegraph on the bridge | Another shot of one of the telegraphs |
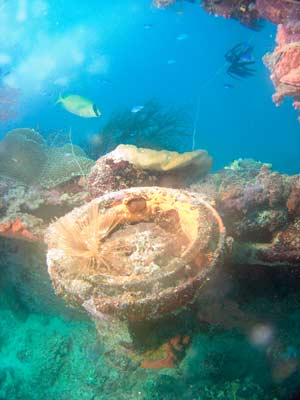
On your second dive on the Shinkoku Maru (it is well worth two dives), head towards the bow. The deck is about 20 metre or so (a bit shallower than the deck at the stern). Once at the bow head out a little and look back at the wreck. You will see that both anchor chains hang down and run away from the vessel. Massive amounts of marine growth, soft and hard corals, camouflage the chains and hull.
Return to the bow (12 metres) and examine the bow gun. This has some of the most incredible marine growth that you will ever see, even on a coral reef. It is almost impossible to even see that it is a gun. There are soft corals of many colours on the barrel and breech.
 |  |
| The bow of the Shinkoku Maru from the starboard side | The extremely colourful bow gun | |
 |  |
| A reel and ventilator inside the forecastle | Kelly McFadyen entering the forecastle | |
The forecastle can be entered via either the port or starboard doors. There are ropes and refuelling pipes in here as well as a spare ventilator. You can also see the anchor locker (a separate compartment within the forecastle) and the chains coming from above. Exit out the other door.
A few metres behind the forecastle there is another of the oil transfer compartments. This is a small raised cabin with a couple of small skylights. You can be enter via the skylights. As per the one behind the bridge, it goes very deep. Be very careful if you enter and go down more than five metres. It is worth dropping in and having a look at the ladders and other items visible from this level. This one is much smaller than the compartment behind the superstructure.
 |  |
| The skylight that leads into the "crew cabin" and oil tank | Looking down inside the oil transfer compartment |
 |  |
| The spare anchor on the deck near the bow | Oil pipes under the bridge area |
As you head back towards the bridge you will see some more hatches. In one of these (I think this one is actually back near the forecastle) you will find the remains of more oil transfer pipes. Below this there is a wooden structure and boxes. It seems that the wooden structure may be a false floor put in to create a crew compartment. The boxes look like a clothes drawers as there are clothes on top and lying around. Under the false floor (which is rotted away in spots) the compartment drops away to about 30 metres or so. At the bottom an oily, mucky slime lies. I would not recommend going deeper than the floor.
Head back along the deck to the bridge. On the deck there is a spare anchor, with the flukes pointing to the port side. There is more incredible growth on the deck, with anemones and clownfish in spots.
At the bridge there are two doors on the deck level that give access to the lower compartments. If you enter the starboard door you will see that this opens into a wide room that runs right through to the rear of the superstructure. On your right in the middle there is another room. This has reels of rope and lots of oil transfer pipes. Exit out the back and go up a level.
 |  |
| An electrical device under the bridge | A water bottle located with other artefacts |
 |  |
A bed pan from the Shinkoku Maru
Photo by Kelly McFadyen | The compass binnacle on the bridge |
This level is the one that has the operating theatre. The next level up has the radios (middle rear) and on the starboard rear corner there is a panel with red and green glass lights. Any ideas what this may be? Email and let me know.
The next level up is the bridge. Finish your dive examining this area again. As mentioned, there are three telegraphs, the helm and compass binnacle to see. The starboard wing of the bridge has a small room that is full of batteries.
For this dive you will get a much longer bottom time. I did 50 minutes before ascending and I never went near deco (a second dive of the day of course).
In summary, while you can get to almost 40 metres at the prop and the engine room is over 30 metres, the main part of the dive is on the deck which goes from 18 metres near the bow to 24 metres near the stern. As mentioned, dive times of around 50 minutes are possible using a computer so long as you do not go to the prop.
 |  |
| The helm of the Shinkoku Maru | Another photo of one of the telegraphs on
the bridge of the Shinkoku Maru |
As I mentioned above, the Shinkoku Maru is still leaking oil over 50 years after its sinking. The oil can be seen as a rainbow sheen while anchoring, but is even easier to notice from its smell. While doing your deco or safety stops, you will probably see small mushroom shaped amber objects slowing coming up towards you. These are small droplets of oil ascending from the wreck. Luckily, the oil is very light and evaporates within minutes of hitting the surface of the water.
This is a great night dive, probably the most colourful you will do anywhere in the World. In summary, the Shinkoku Maru is another great wreck, one of the best in Chuuk Lagoon.
Dives:
16 February 1991
17 February 1991
18 November 1994
20 November 1994
9 November 1997
7 September 2005
20 October 2011
30 October 2011
References:
|  v6.00.307 © 2003-2005

